Custom Games is one of the available playlists in Overwatch 2, replacing the Game Browser from Overwatch. You can find many different ways to play in Custom Games or make your own with customizable settings. In this section, we will go over all the settings and all the different ways on how you can make a great custom game mode.
Info[ | ]
Find that perfect match or just create one.
Browsing[ | ]
There are 4 tabs in the custom games browser: Popular, Favorites, Recent and All games.
Popular[ | ]
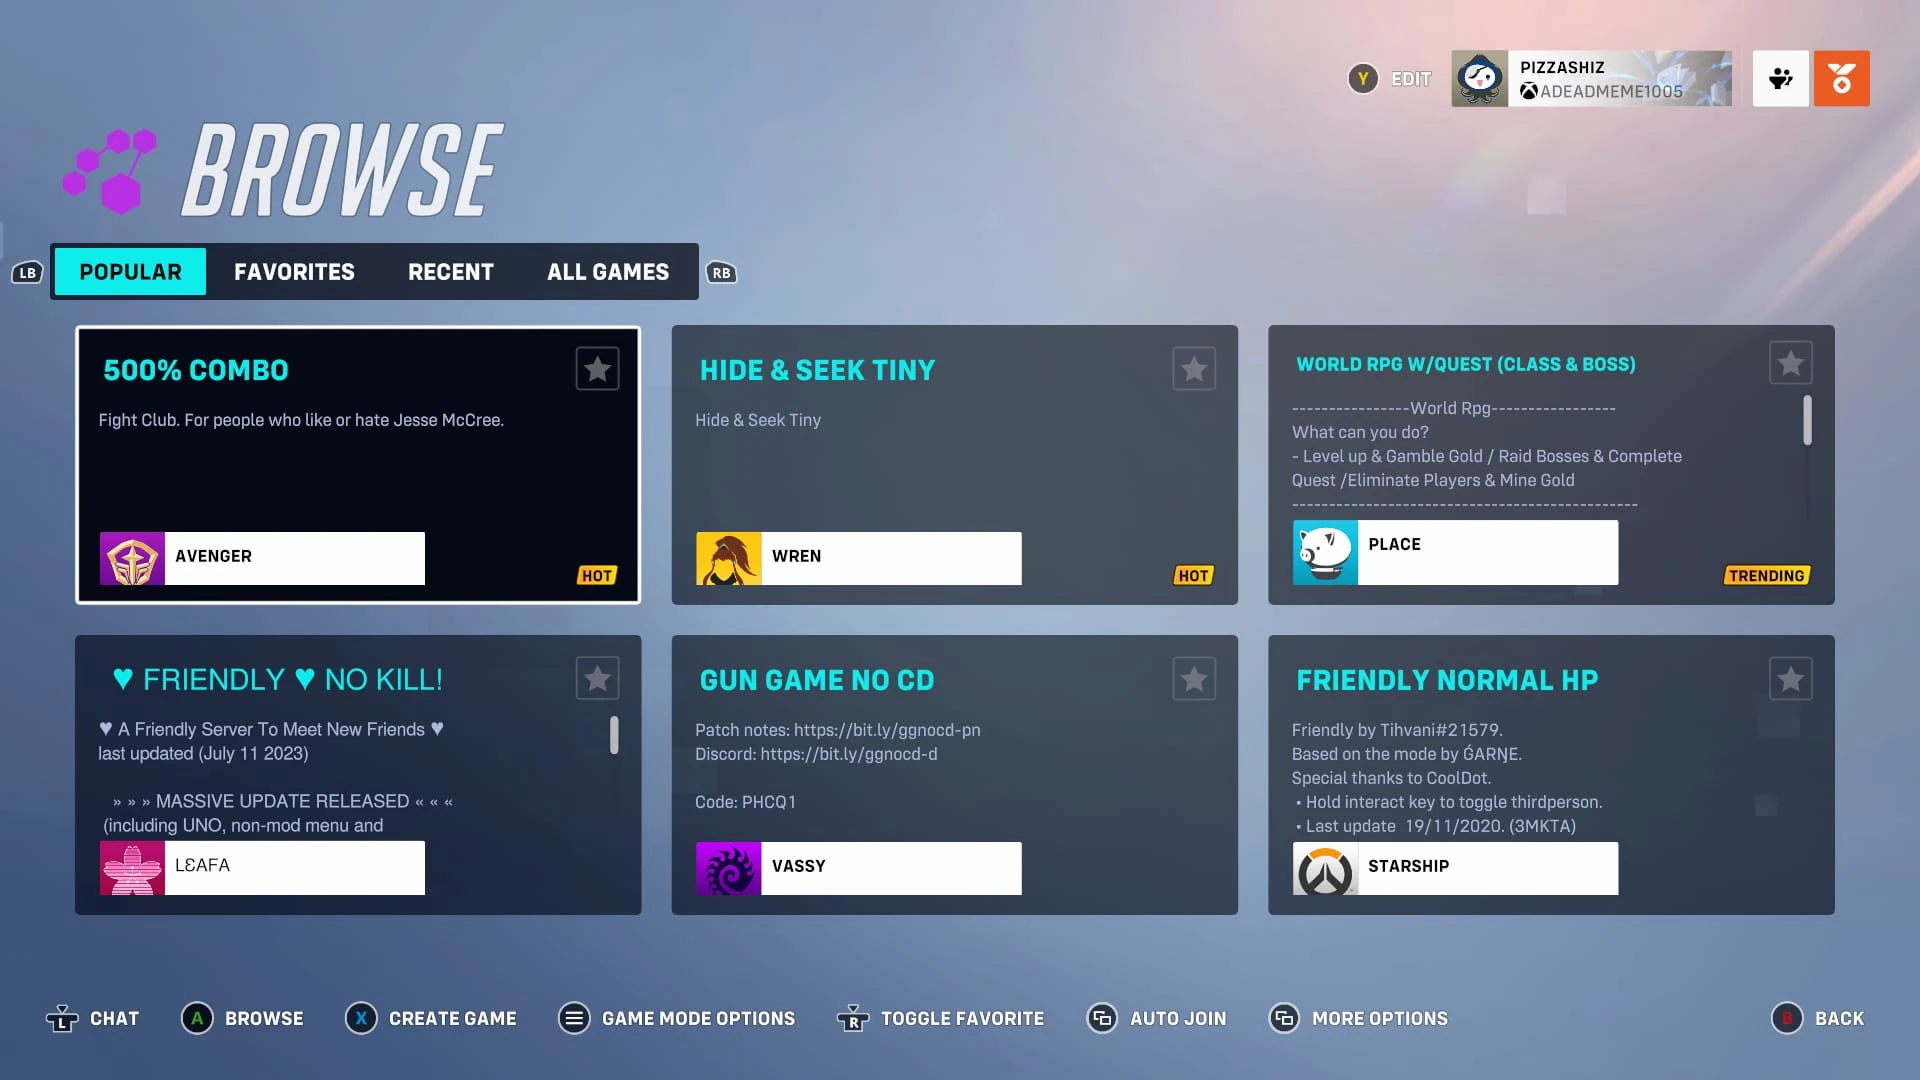
Popular tab
In the popular tab, 6 custom Game Modes will be featured. Some may be labelled with "Hot" or "Trending" and some may just be there with no tags. These custom games will be the ones that gets the most plays. This tab will get updated weekly, unless the custom games are still most played.
Favorites[ | ]
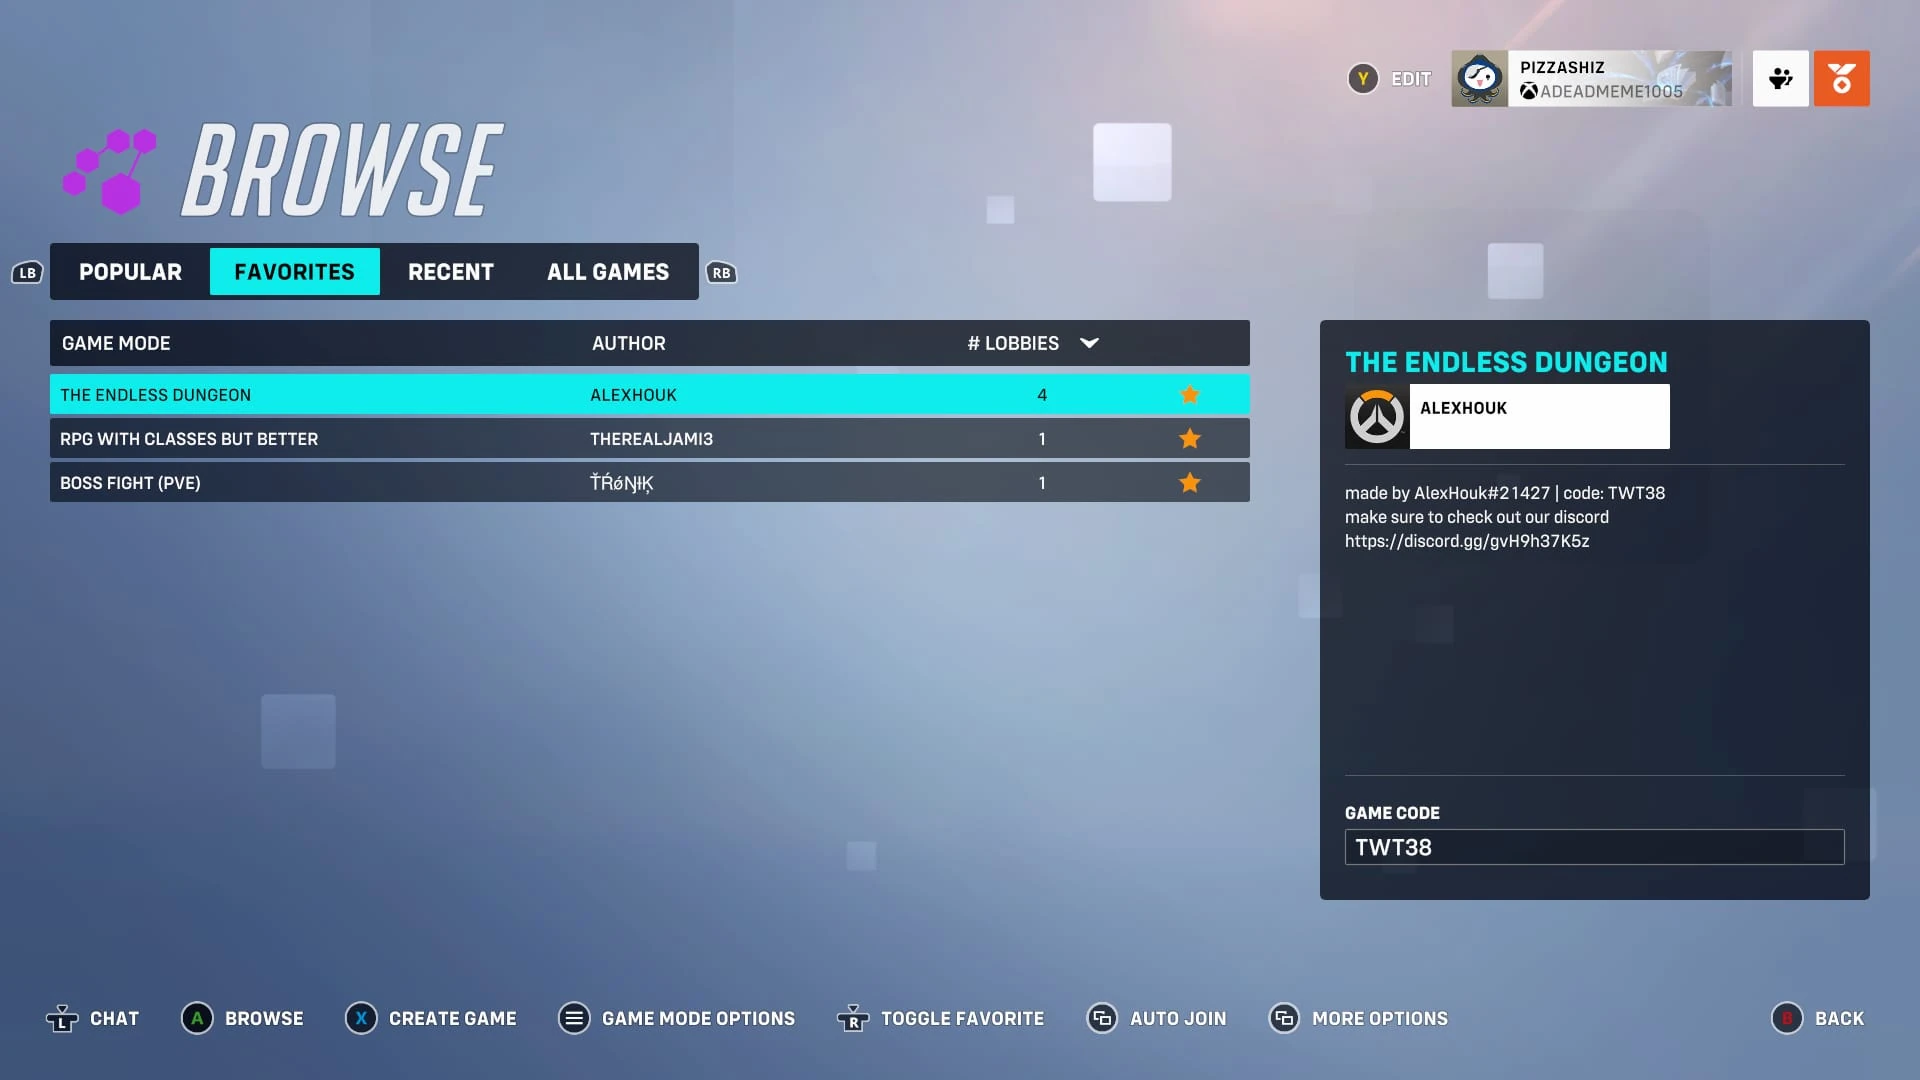
Favorites tab
You can toggle favorites in the browse menu. In this tab, the custom game you hover over will have its information shown on the side as well. Instead of showing the regular columns it shows on the "all games" tab, it shows the author and how many lobbies. Only your favorited custom games will show here.
Recent[ | ]
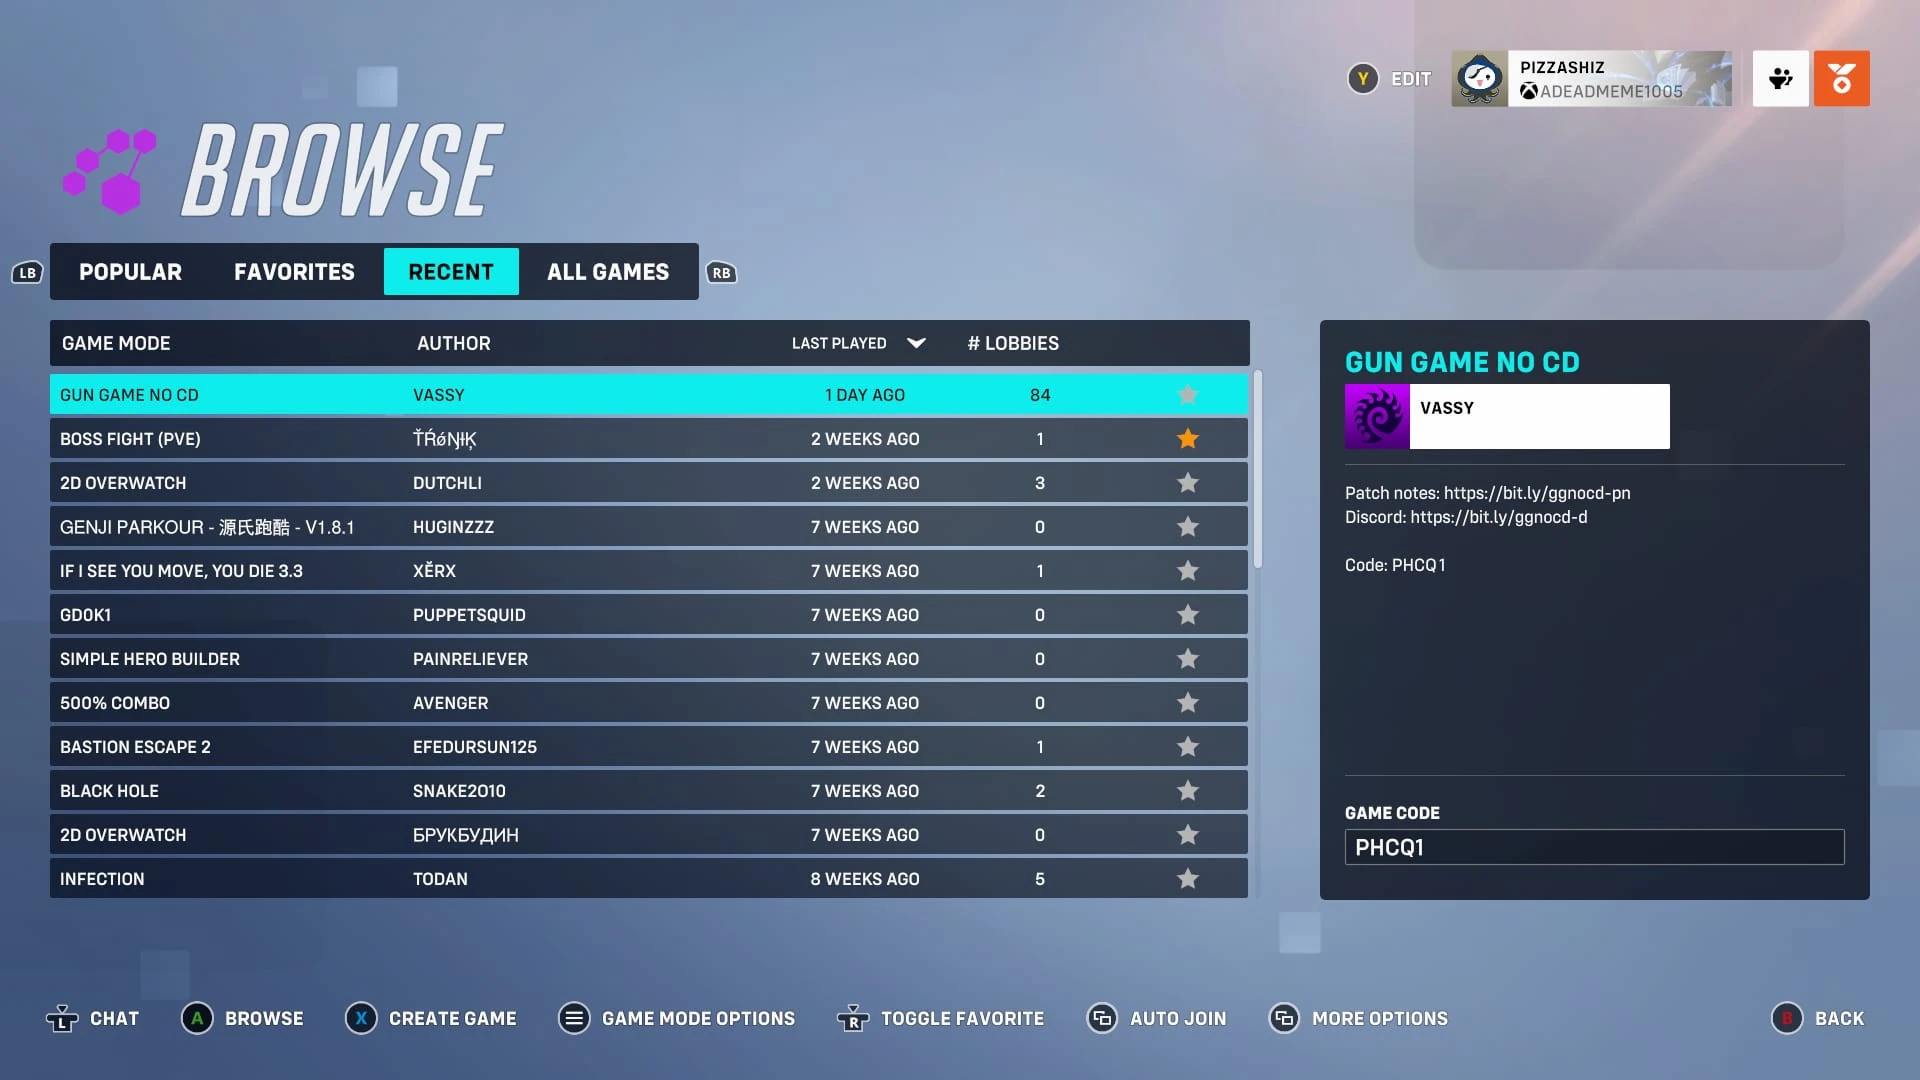

Recent tab
In this tab, the custom game you hover over will have its information shown on the side as well. Instead of showing the regular columns it shows on the "all games" tab, it shows the author and how many lobbies. For a custom game to show up here, you must have had to play it. Creating a lobby for it will not save it here.
All games[ | ]
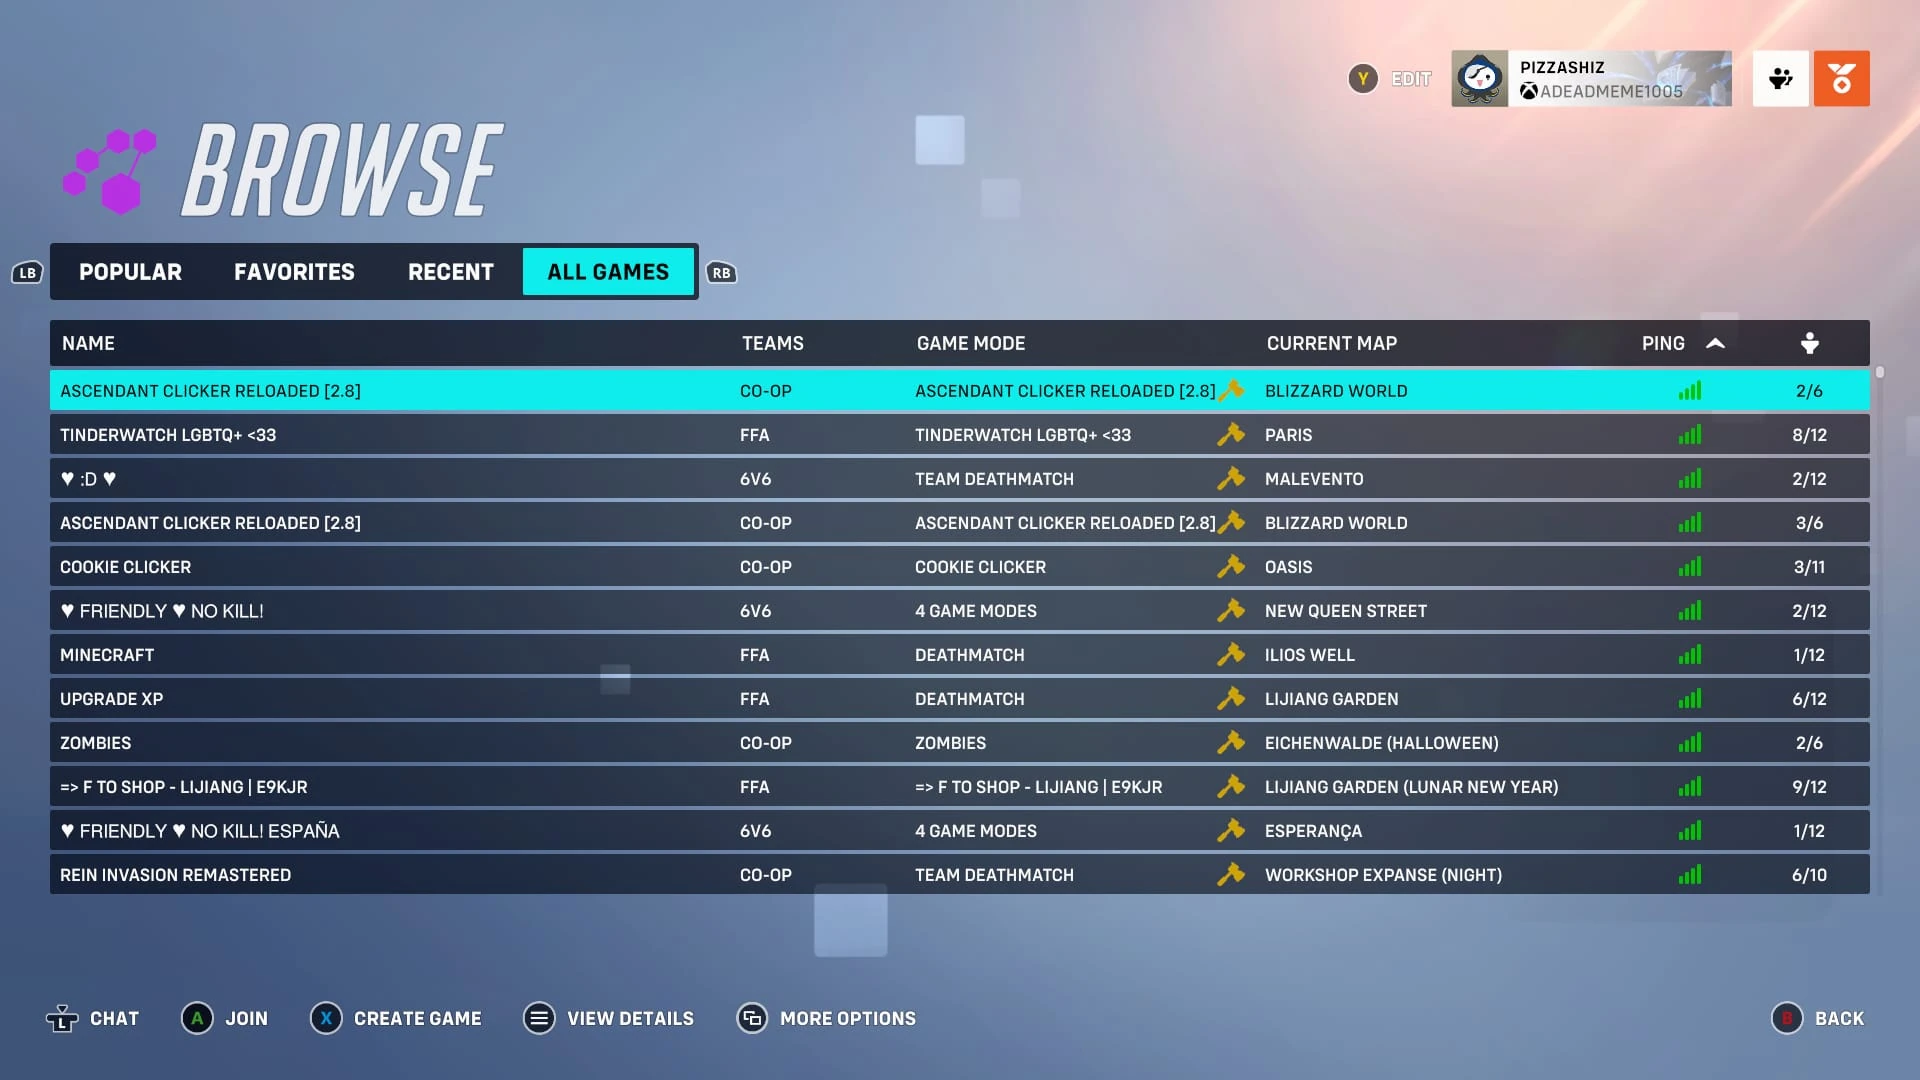

All games tab
Every custom game that is available in your region will be shown here. Custom games created in the workshop editor will have a hammer next to the map the custom game is on. This page updates on a refresh or re opening the custom games menu.
The lobby[ | ]
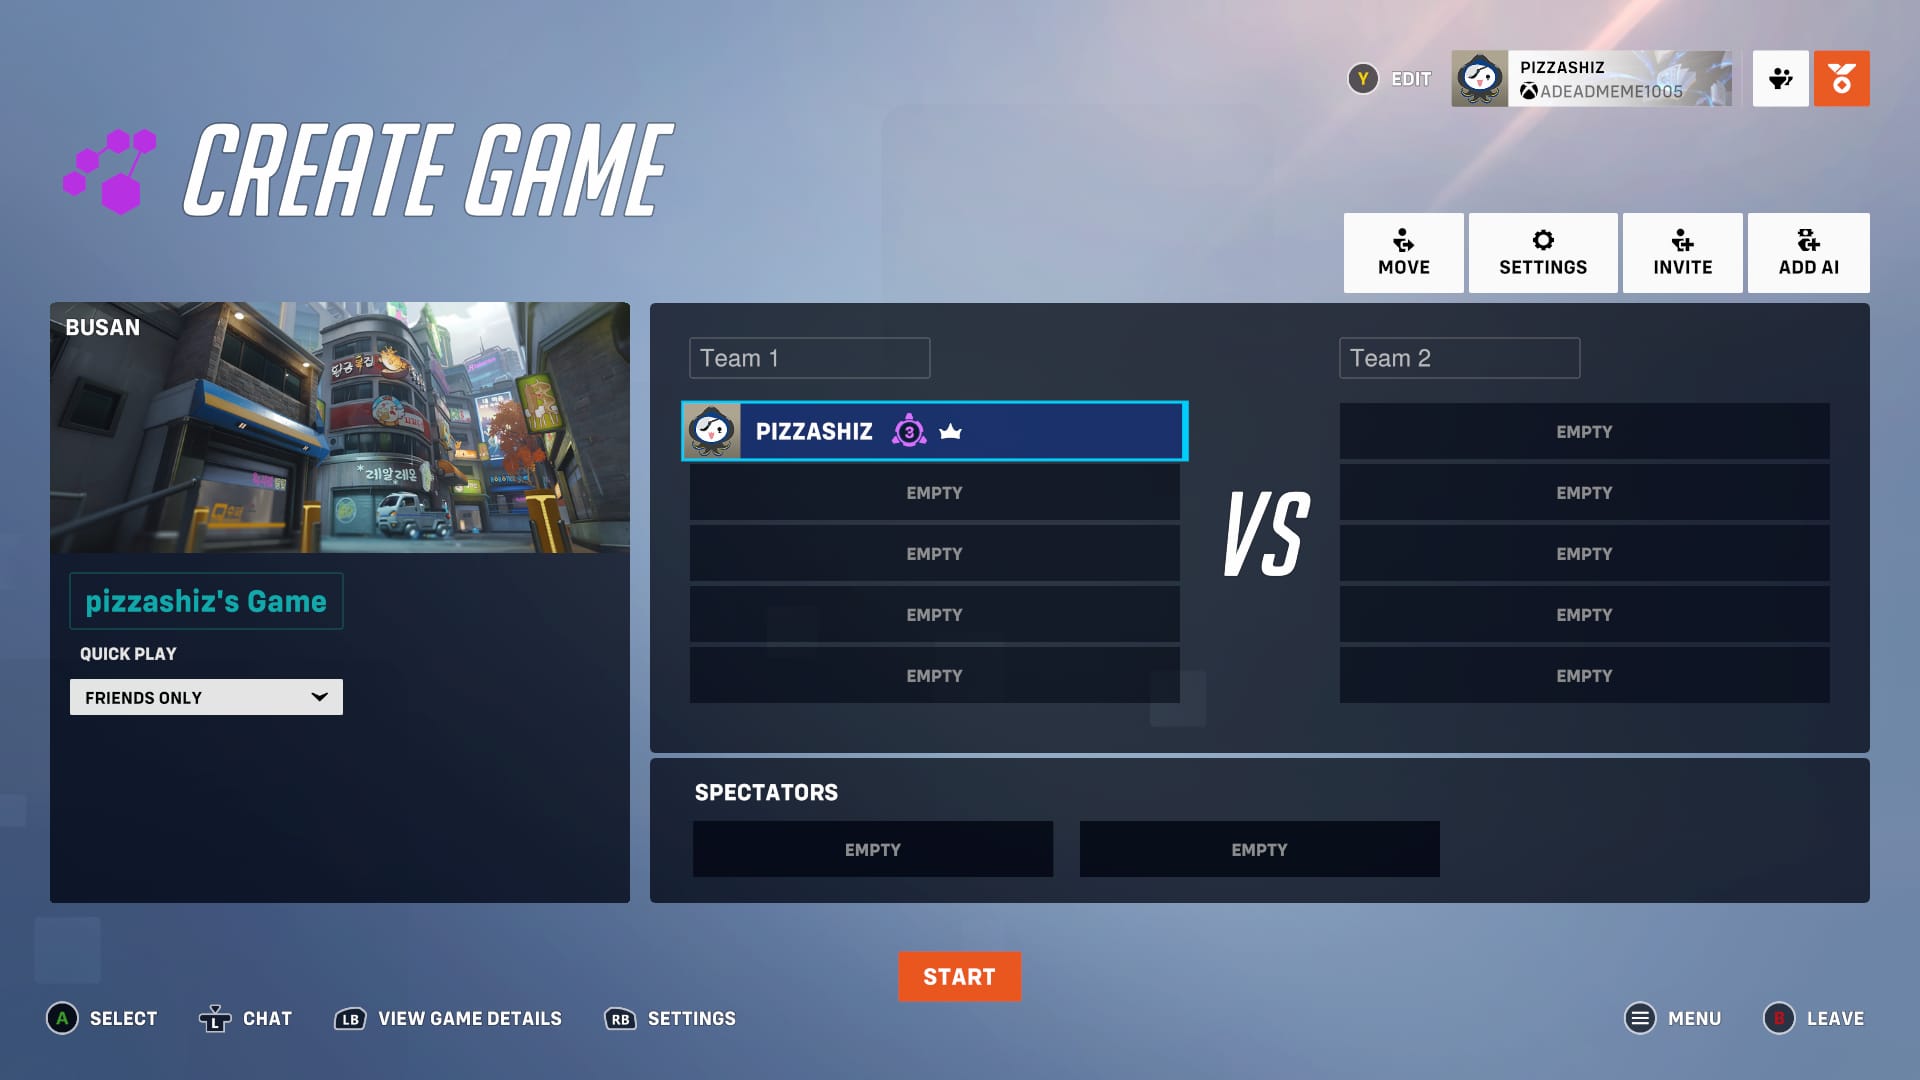

Lobby view
Upon selecting a custom game from the menus, you will be either taken straight into the game or into the lobby depending on whether the host has started. If you have joined, you will be playing the custom game created by the host with its own ruleset.
Players can create their own custom game lobby by pressing the +CREATE button next to the search field. Upon entering the lobby you will notice a lot of things surrounding the player list:
On the left, there is the current map the name will be displayed on the map), your own custom game name (you can edit this at any time by just simply selecting it and typing the name you wish to chose, the current game mode and the publicity (Default: friends only, invite only and everyone).
In the centre, you have the teams. If FFA is selected the "VS" will be removed and so will the team names. You can edit the team names to be whatever you like. The owner of the custom game mode will be placed on team 1 every time they create a custom game unless they used a template that has already been made. You can also change the amount of players to be 12 via the lobby settings.
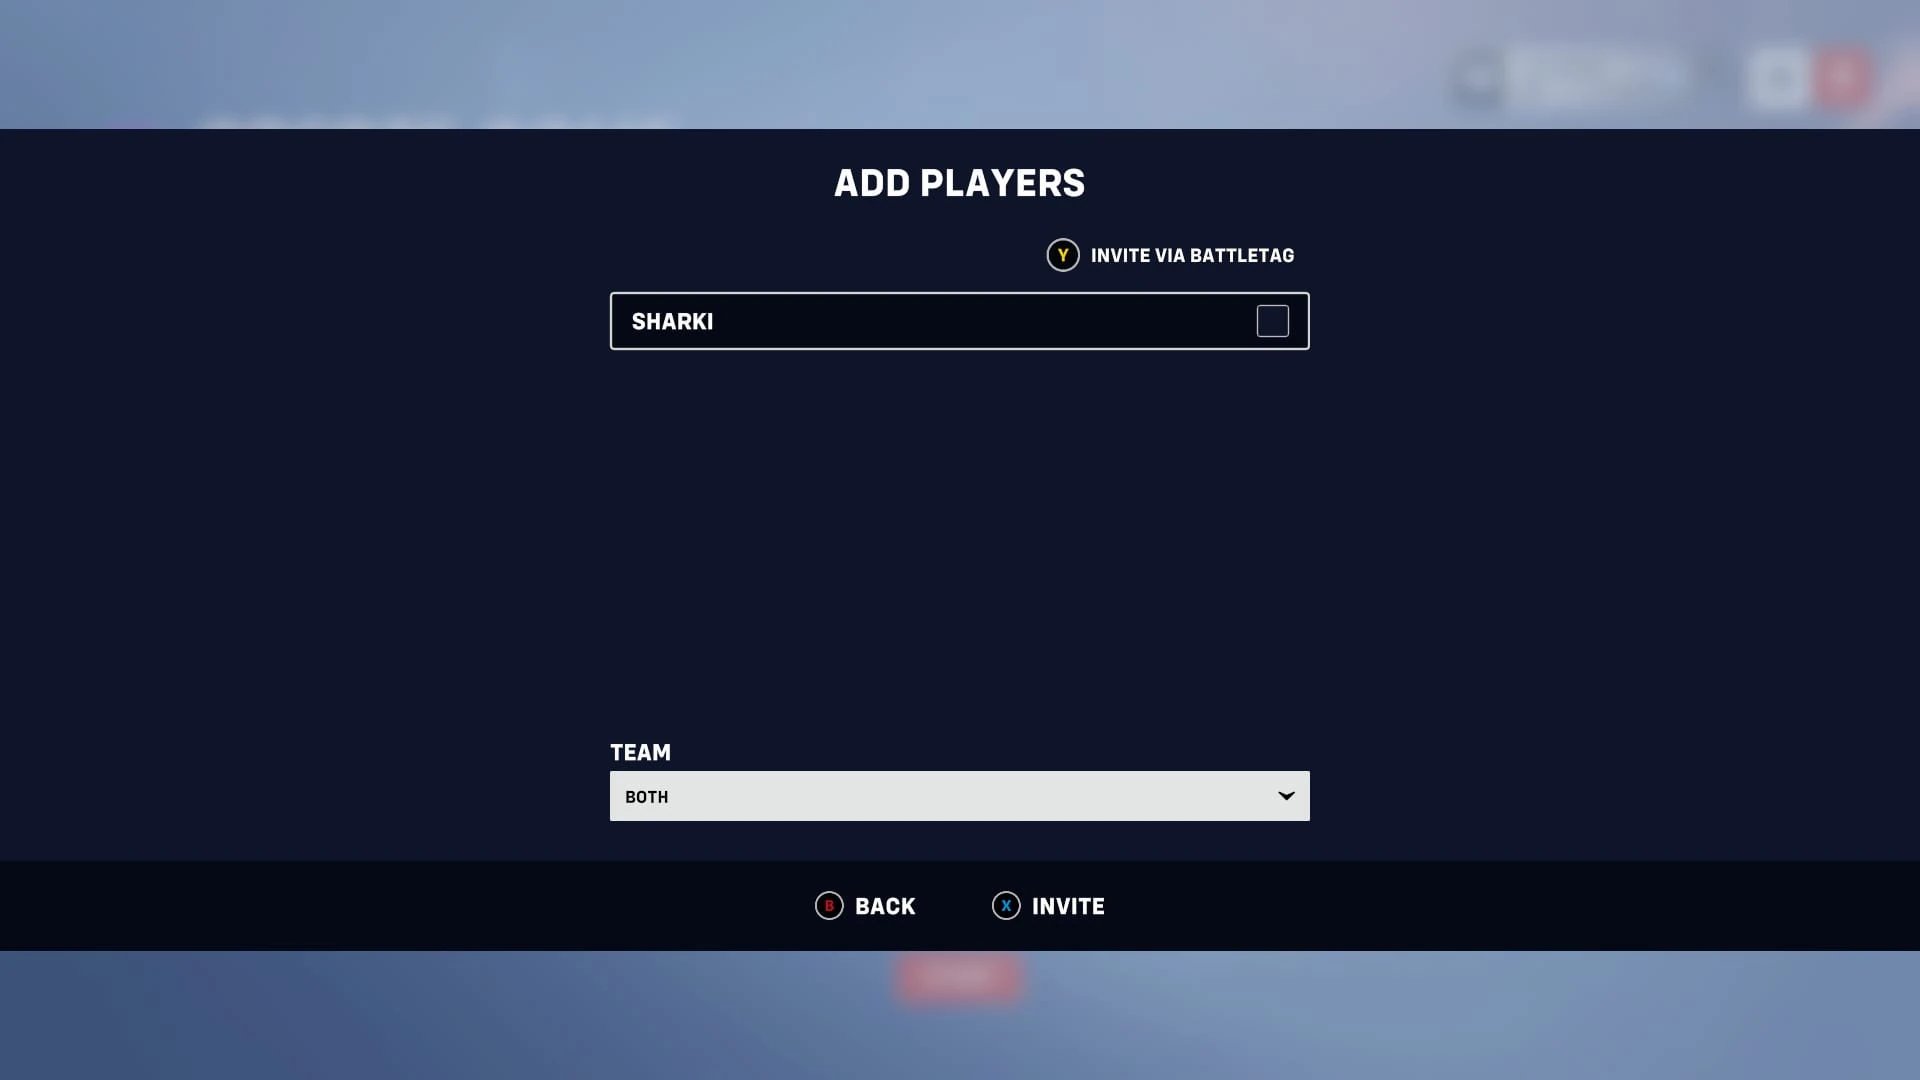

Invite menu
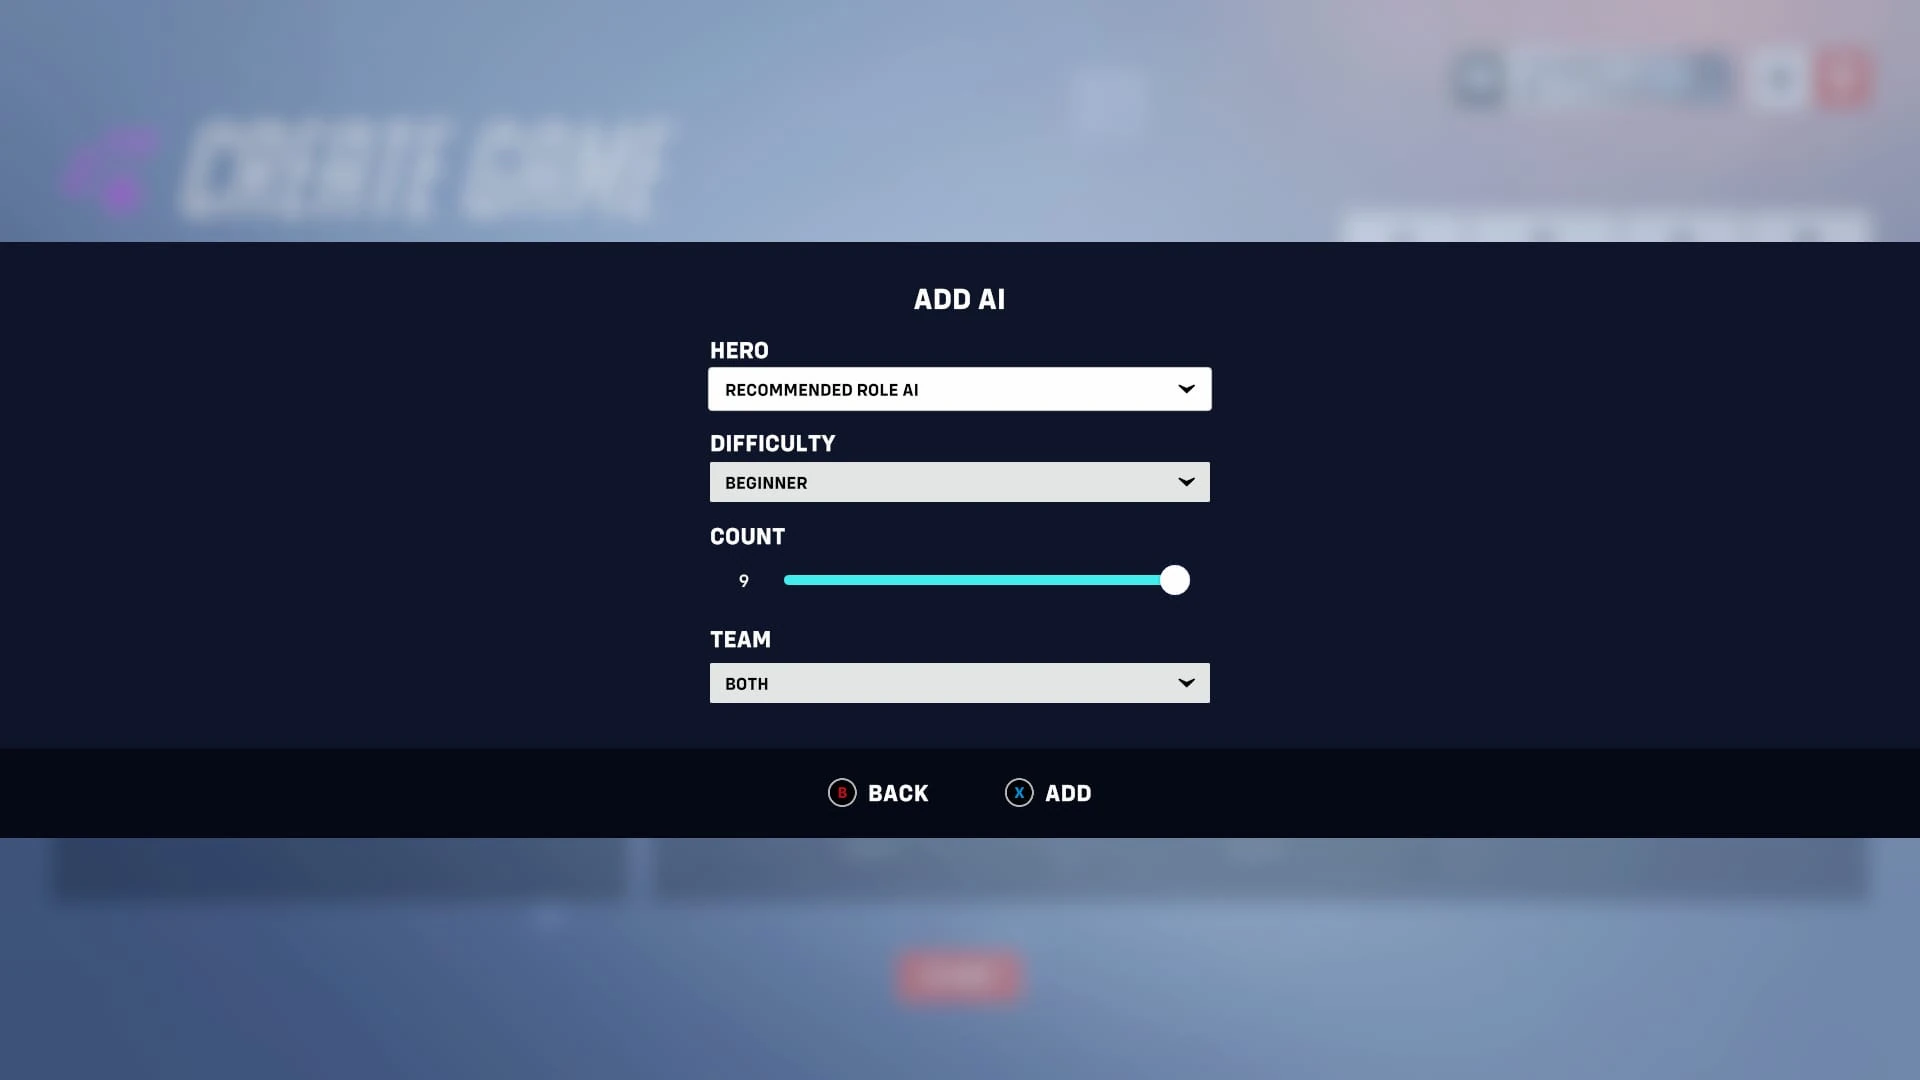
Above the player list there are four buttons: "Move", "Settings", "Invite" and "Add AI". Using the Move button, you can instantly put everyone on separate teams or you can select a player and swap them with another player by selecting the player you wish to swap them with. The Settings button takes you to the Settings menu, where you can adjust the game mode and lobby. The Invite button allows you to either invite someone out of your Blizzard friends list or directly using their battle tag. Once you have selected someone the check-box next to their name should have a green check mark, this allows you to select more then one person at that time. After that, you can select what team they go on. If it is an FFA, they will be assigned the next slot available, if not then you can decide whether they go on team 1 or team 2.
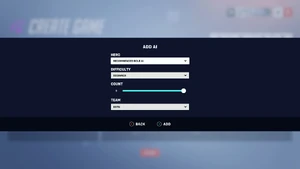
Add AI menu
Finally, we have the add AI button. In this menu, you can choose to add computer controlled players to the game. You can individually set them to use a certain hero (nearly all heroes will be available to add as an AI) or a hero from certain role. If you use the recommended role AI button, it will give you 1 tank, 1 damage and 2 support. Next, you can chose the difficulty, these are:
- Beginner
- Practice
- Casual
- Hard
- Lethal
- Extreme
- Ultimate
- Aimbot
You can then choose the amount of the specific AI you want with the count section. And finally, you can chose what team for them to go on, team 1 or team 2. AI may not work in all game modes so do not be shocked if the AI is not working in a game mode.
Below the player list, there are the spectator slots, with the maximum amount being 12 and the default being 2. You change the amount in the settings. When you are ready, you can start the custom game mode with the Start button.
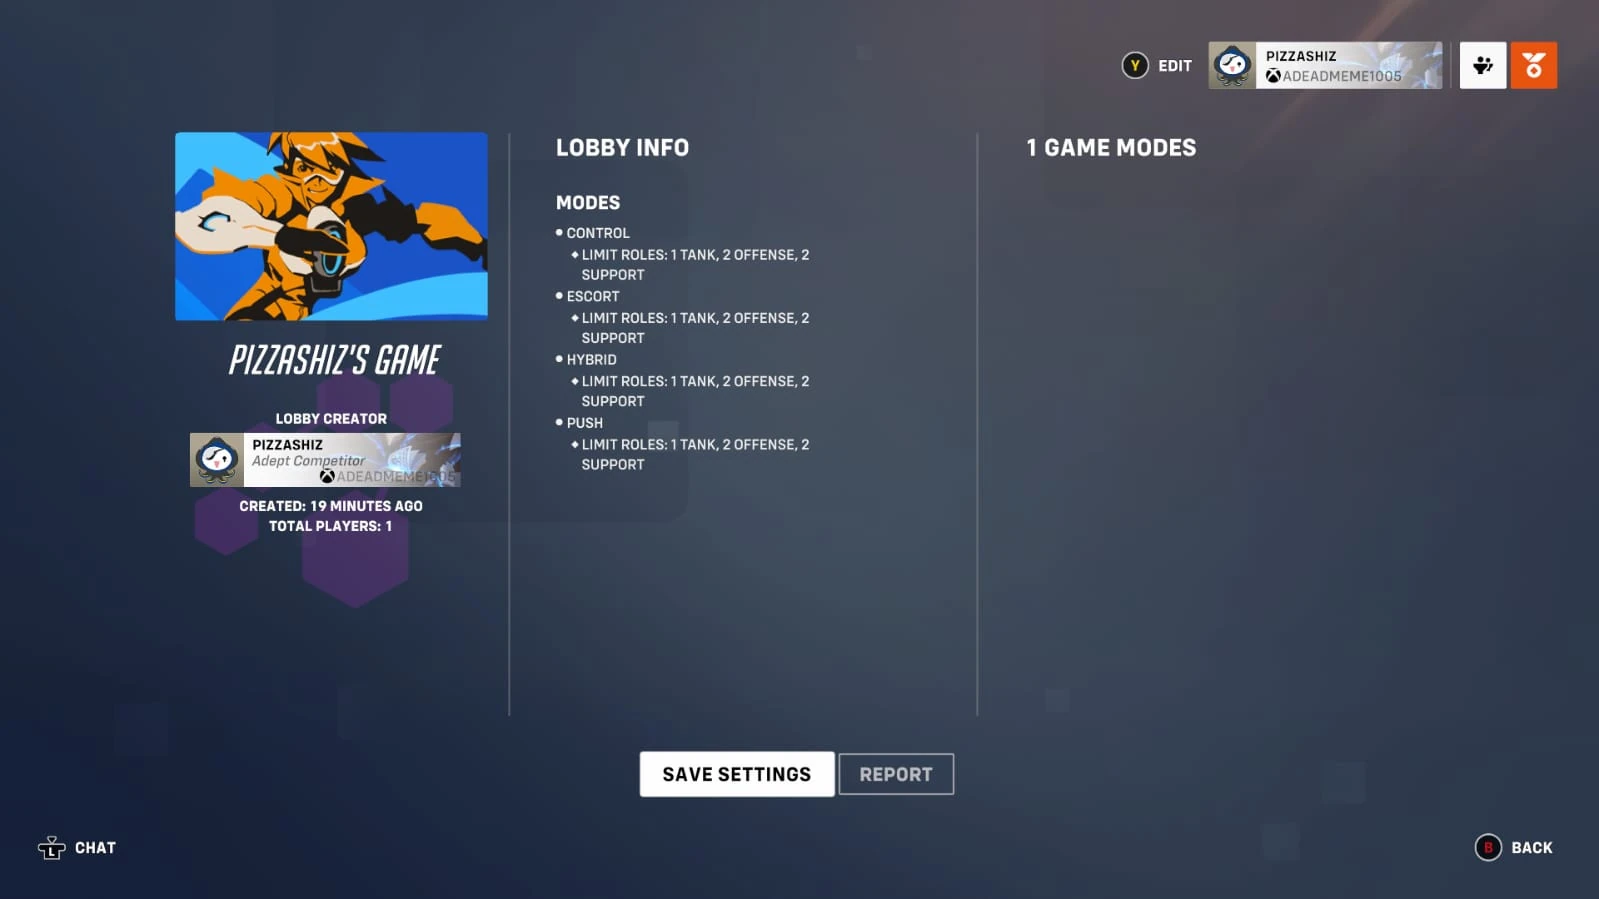
Viewing the summary[ | ]

Game details screen
You can access the summary through the lobby.
On the left, the game mode's image is portrayed, in this case Unranked. Beneath that is the custom game name, the creator, how long it has been up for and the total amount of players.
In the centre, there is the lobby information, this will display any changes made excluding Workshop changes. You can save presets here as well as report existing custom game modes.
On the right, the games description will be displayed, you can change this in the summary (See the settings section).
Settings[ | ]
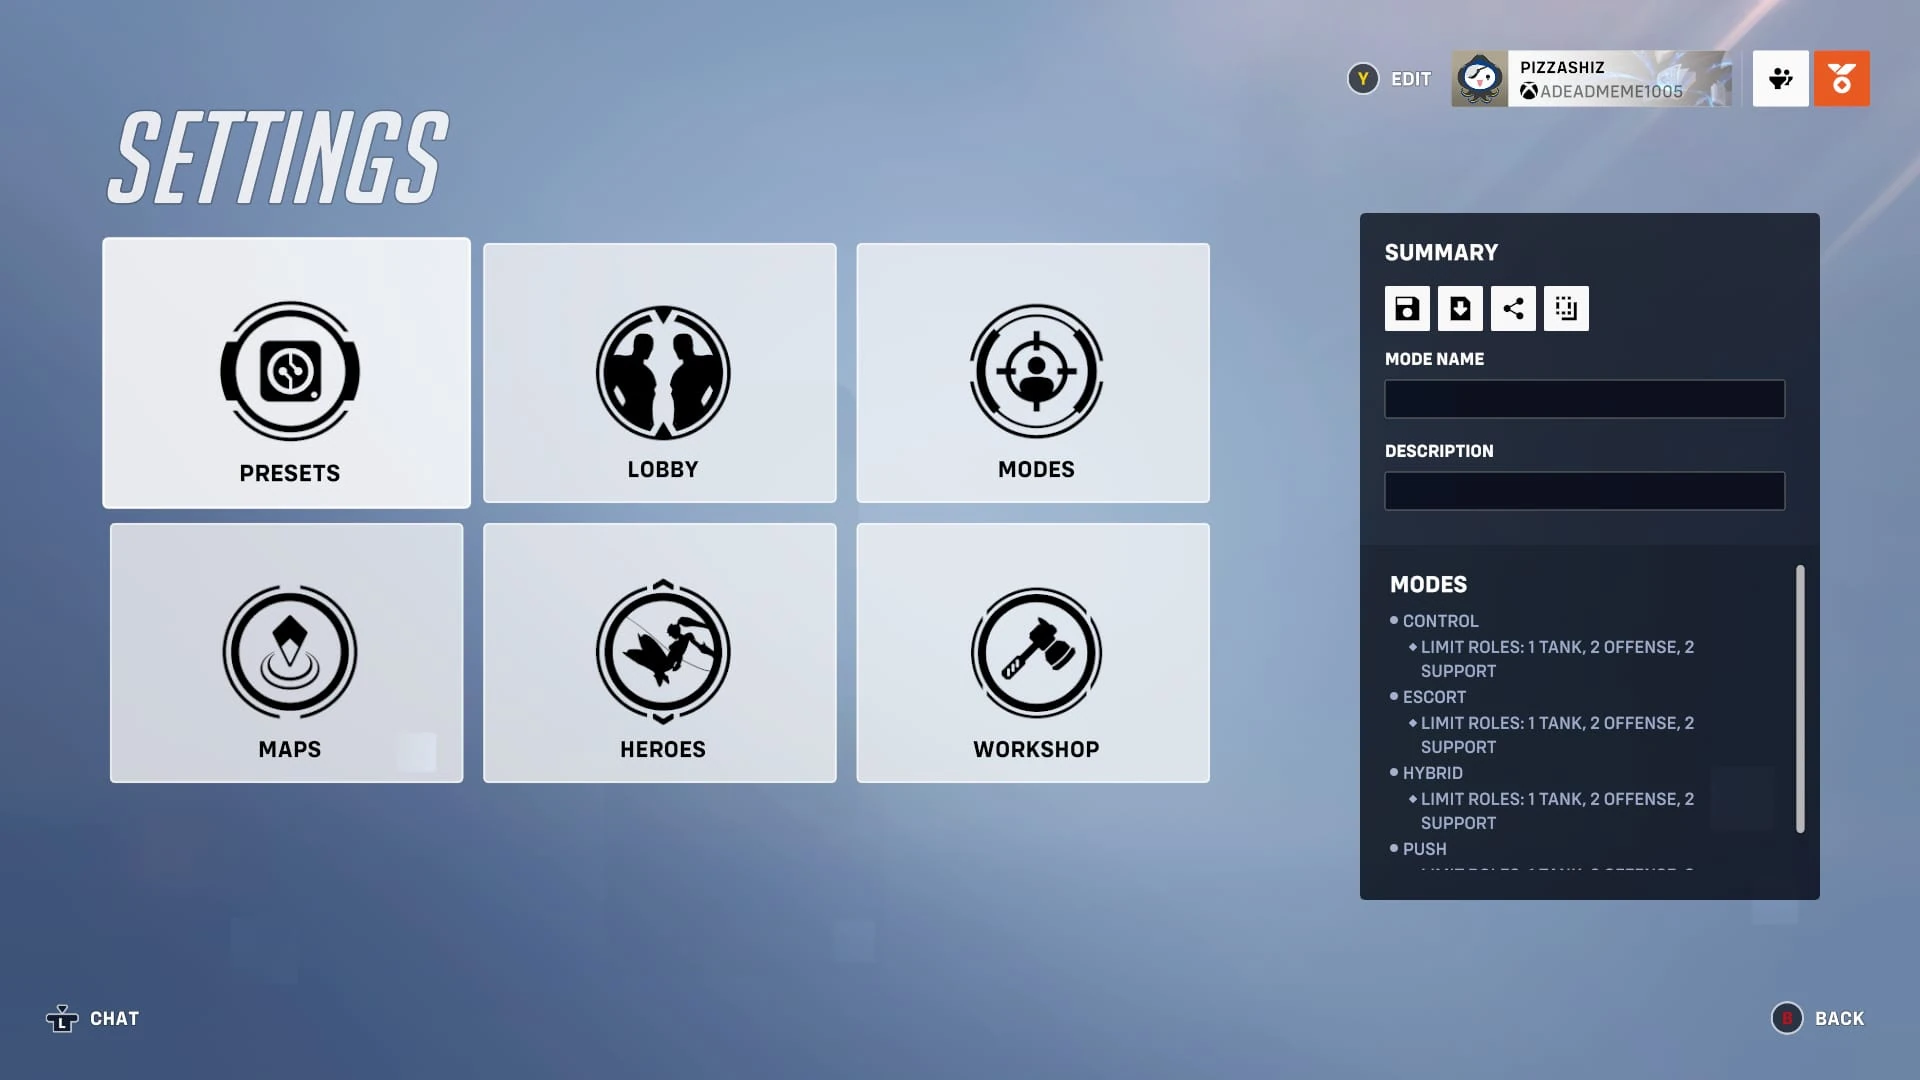
Settings menu
In the settings, there are 7 options with 1 being exclusive to workshop modes. There is the presets, lobby, modes, Maps, hero and workshop settings. As well as being on this menu is the summary. We will go through everything individually in this section.
Presets[ | ]
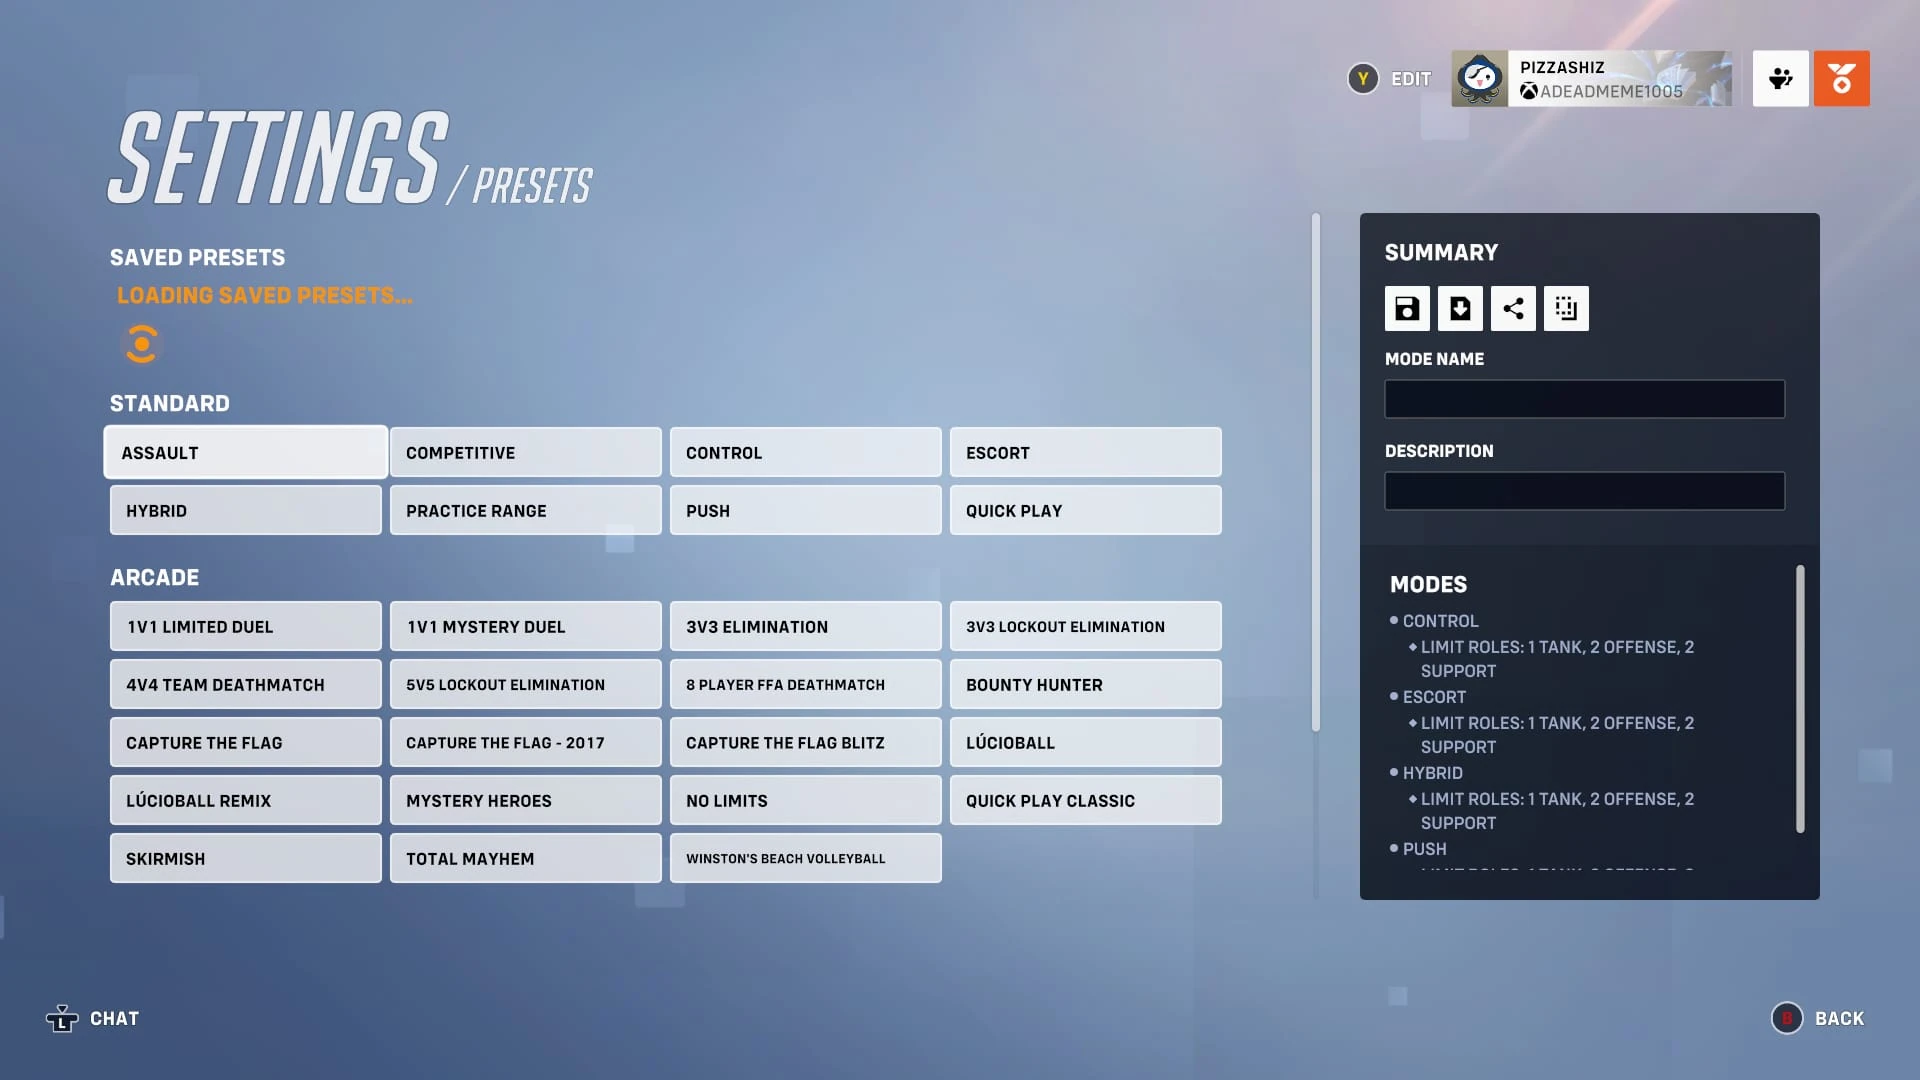
Presets menu
Presets are premade game modes. They are also modes that already exist in the game. They have been split into 4 sections, we will go over all of them.
Saved presets[ | ]
These are presets you have saved from other games. Once you have saved them, you can change the name, delete it or share it. You can create the game mode after a confirmation. Remember to save anything you have been working on if you want to keep it because it will not save automatically.
Standard presets[ | ]
These are presets of existing game modes with no new rules these include:
- Assault from the Arcade
- Competitive Play (Includes Control, Escort, Hybrid, Push but with competitive rules)
- Control
- Escort
- Flashpoint
- Hybrid
- Push
- Practice Range form Training
- Quickplay (Includes Control, Escort, Hybrid, Push, Flashpoint with standard rules)
You can still change these rules how ever you like, these are just templates.
Arcade presets[ | ]
Many game mode from the arcade are present. During Seasonal events, their game modes can be found here. The following presets are available no matter of season:
- 1v1 Limited duel
- 1v1 Mystery duel
- 3v3 Elimination
- 3v3 Lockout Elimination
- 4v4 Team Deathmatch
- 5v5 Lockout Elimination
- 8 Player FFA
- Bounty hunter
- Capture the Flag
- Capture the Flag - 2017
- Capture the Flag Blitz
- Mystery Heroes
- No Limits
- Quick Play Classic
- Skirmish
- Total Mayhem
Workshop examples[ | ]
There a total of 10 workshop examples, these can help new players learn workshop code and get to try out the new ways to play. The 10 examples are:
- Molten Floor
- One Ultimate
- Hide and Seek
- Double Jump
- Fire Dome
- Balanced Mystery Heroes
- Mirrored DeathMatch
- Zombie
- Hero Gauntlet
- Server Load
Lobby[ | ]

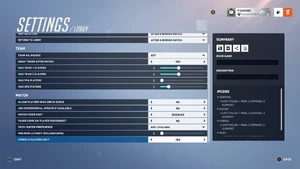
Lobby settings
Map settings[ | ]
- Map Rotation - Choose when a map can rotate
- (Default) After a mirror match - after both sides have played on attack and defence
- After a game - after one game
- Paused - map will not rotate until unpaused
- Return to Lobby - Choose when you go back to the lobby
- (Default) After a mirror match - after both sides have played on attack and defence
- After a game - after one game
- Never - you will never return to the lobby
Team settings[ | ]
- Team balancing - Choose when teams will reach equal players
- (Default) Off - teams will not get balanced
- After a mirror match - teams will get balanced after both teams have played on attack and defence
- After a game - teams will get balanced after each game
- Swap teams after match - Choose if each team gets to play on attack or defence
- (Default) No - teams will never get swapped
- Yes - teams will get swapped after a match
- Max team 1 players - Choose how many players get to be on team 1
- Default is 5, you can chose up to 12, if 12 is chosen you cannot have any players on team 2
- Max team 2 players - Choose how many players get to be on team 2
- Default is 5, you can chose up to 12, if 12 is chosen you cannot have any players on team 1
- Max FFA players - Choose how many players there are during a death match
- You can chose up to 12, default is 0
- Max Spectators - Choose how many people can spectate at any time
- You can chose up to 12, default is 2
Match settings[ | ]
- Allow players who are in queue - Choose if you want to allow people who are queuing for a game
- (Default) No - People in a queue cannot join your custom game
- Yes - People in the queue can join your custom game
- Use experimental update if available - Choose whether you want the recent experimental game mode changes to take place inside of your custom game
- (Default) No - The recent experimental update will not be applied
- Yes - The recent experimental update will be applied
- Match voice chat - Choose if you want players to speak in the match chat
- (Default) Disabled - Players cannot join match chat
- Enabled - Players can join match chat
- Pause game on player disconnect - Choose whether the game will pause if someone leaves the game
- (Default) No - The game will not pause if someone leaves
- Yes - The game will pause if someone leaves
- Data center preference - Choose where the data preference is
- (Default) Best available - The best available data preference will be applied
- Netherlands - The Netherlands data preference will be applied
- France - The French data preference will be applied
- Brazil 2 - The Brazilian 2 data preference will be applied
- Finland 2 - The Finland 2 data preference will be applied
- Singapore 2 - The Singaporean 2 data preference will be applied
- Japan 2 - The Japanese 2 data preference will be applied
- South Korea - The Southern Korean data preference will be applied
- USA - West - The Western American data preference will be applied
- Bahrain - the Bahraini data preference will be applied
- USA - Central - The Central American data preference will be applied
- Australia 3 - The Australian 3 data preference will be applied
- Taiwan - The Taiwanese data preference will be applied
- Minimum Latency (Milliseconds) - Choose the minimum time it takes to traverse a computer network
- Default is 0, maximum is 150.
Modes[ | ]
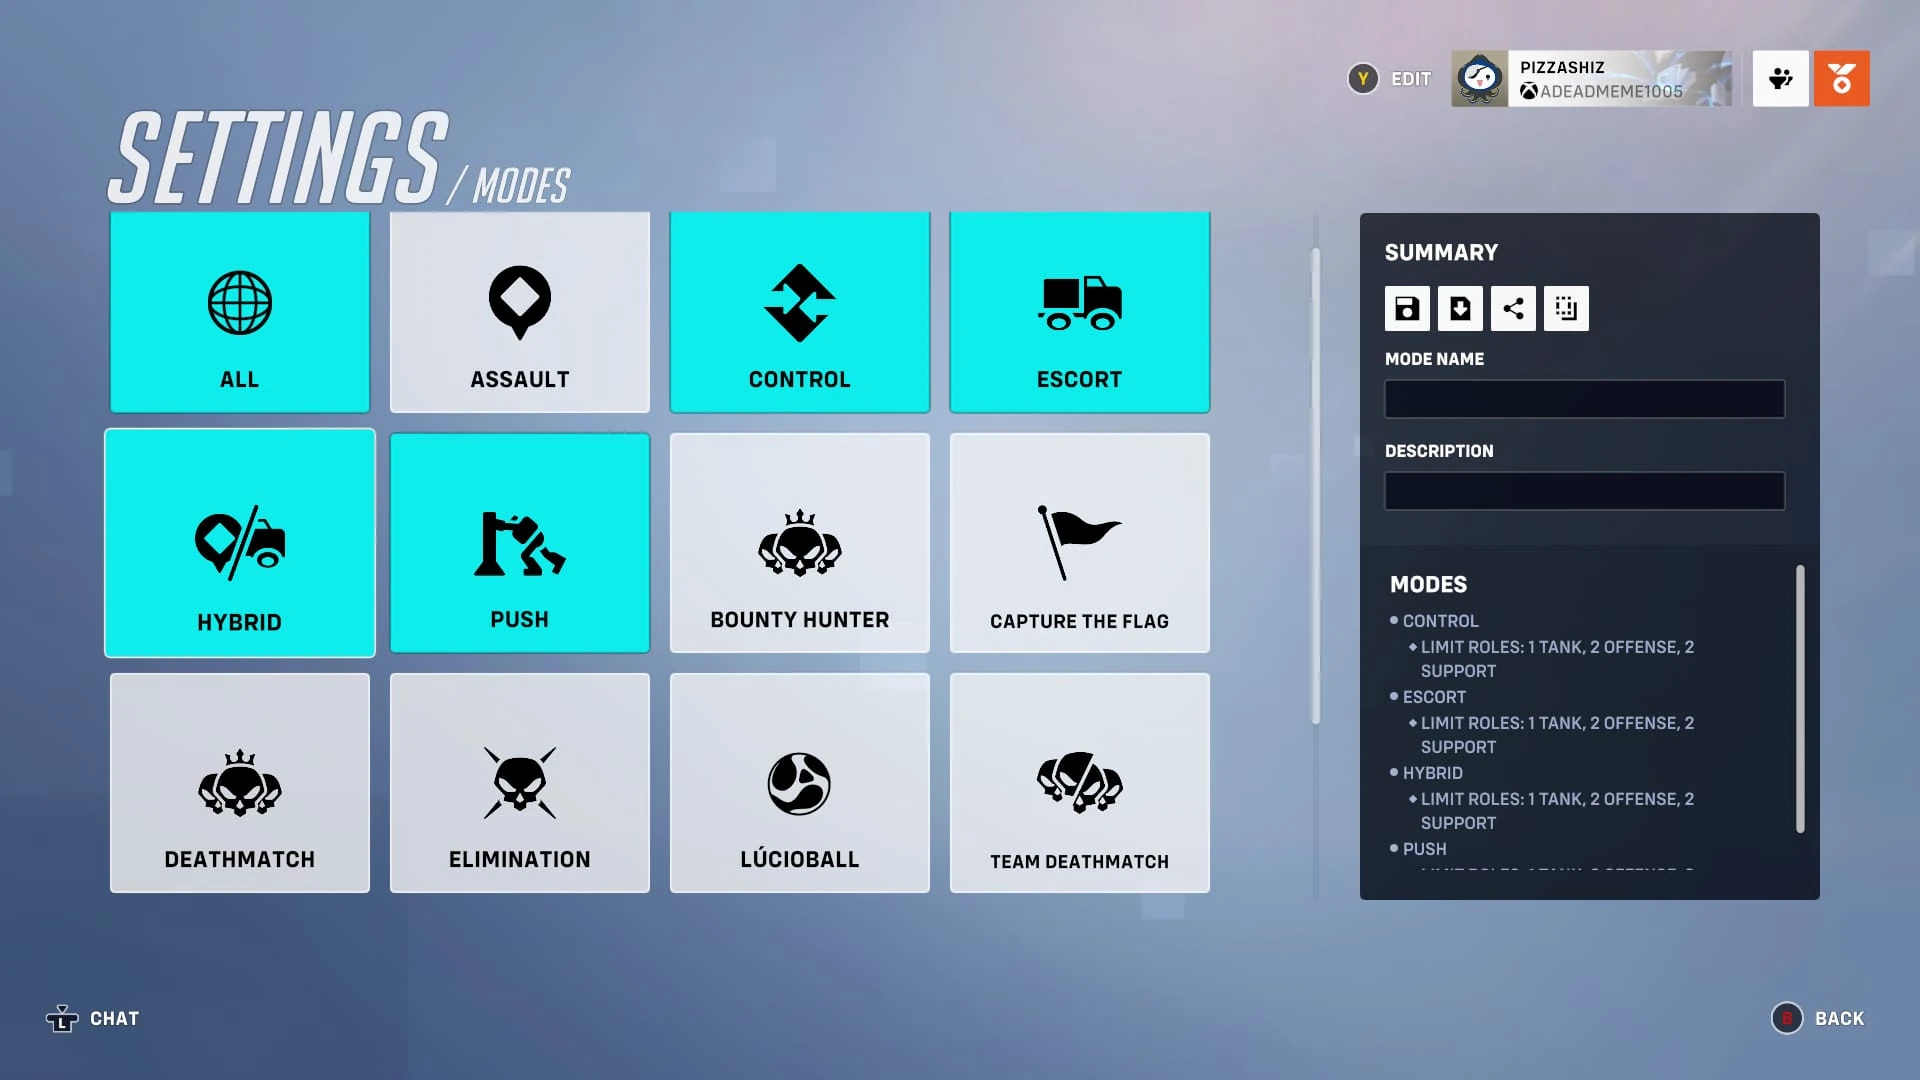

Modes settings. Taken during "Summer Games 2023".
All[ | ]
General[ | ]
- Enemy health bars - Choose whether you want enemy health bars to be visible to the opposing team
- (Default) Enabled - Enemy health bars will be visible to the opposing team
- Disabled - Enemy health bars will not be visible to the opposing team
- Game mode start - Choose when the game starts
- (Default) All slots filled - When the custom game is full the game starts
- Immediately - The custom game starts without needing the game mode being full
- Manual - The host manually starts the custom game by the start button
- Health pack Respawn time scalar - Choose how long it takes for health packs to respawn
- (Default) 100% - Health packs respawn at the standard rate
- 0% - Health packs respawn faster then standard rates
- 500% - Health packs respawn slower then standard rates
- Kill cam - Choose whether the kill cam is enabled or not
- (Default) Enabled - The kill cam will be visible by players
- Disabled - The kill cam will not be visible
- Kill Feed - Choose whether the kill feed is visible by players
- (Default) Enabled - The kill feed will be visible by players
- Disabled - The kill feed will not be visible by players
- Skins - Choose if people will have the casual skins or any skin for each hero selected
- (Default) Enabled - Owned skins will be able to be used
- Disabled - Casual skins will be used by each player
- Spawn health packs - Choose if health packs spawn around the map
- (Default) Determined by mode - Packs will spawn depending on mode
- Enabled - Packs will always spawn
- Disabled - Packs will never spawn
Heroes[ | ]
- Allow hero switching - Choose if you can swap heroes throughout the game
- (Default) Enabled - Players can switch heroes throughout the game
- Disabled - Players cannot switch heroes throughout the game
- Hero limit - Choose how much of one hero can be in each team/game
- (Default) 1 per team - Only one type of a hero per team
- 2 per team - Only two types of heroes per team
- 1 per game - Only one type of hero per game
- 2 per game - Only two types of heroes per game
- Off - No hero limit
- Limit roles - Choose how much of each role can be in game per team
- (Default) 1 tank, 2 offense, 2 support - Only 1 tank, 2 damage and 2 support per each team this is the casual role requirements for role queue
- 2 of each role per team - You get 2 tanks, 2 damage, 2 supports per each team
- Off - No role limit per team
- Respawn as random hero - Choose whether you get a random hero after death
- (Default) Disabled - You will not respawn as a random hero
- Enabled - You will respawn as a random hero
- Random hero role limit per team - Choose how much of one role can be on one team if you have Respawn as random hero setting enabled
- (Default) 6 - 6 of any role allowed on one team at any time
- 1 - Only 1 of each role on a team ream at any time
- Respawn time scalar - Choose how long it takes to respawn
- (Default) 100% - Standard respawn time
- 0% - Takes less time to respawn
- Tank role passive health bonus - Choose whether tanks get a health bonus depending on team composition
- (Default) 1 tank, 2 offense, 2 support - There has to be the 1,2,2 role setup active for the tanks to receive the health bonus
- Disabled - Tanks will never get the health bonus
- Enabled - Tanks will always get a health bonus
Assault[ | ]
- Enabled - Choose whether you want assault enabled
- (Default) Off - Assault is disabled
- On - Assault is enabled
- Capture speed modifier - Choose how fast you capture the objective
- (Default) 100% - Capture the objective at standard time
- 500% - Capture the objective faster then standard time
- 0% - Capture the objective slower then standard time
- Competitive rules - Choose whether to play with or without competitive rules enabled
- (Default) Disabled - Competitive rules are not enabled
- Enabled - Competitive rules are enabled
Control[ | ]
- Enabled - Choose if control is enabled
- (Default) Off - Control is disabled
- On - Control is Enabled
- Capture speed modifier - Choose how fast you can capture the objective
- (Default) 100% - Capture the objective at standard time
- 500% - Capture the objective faster then standard time
- 0% - Capture the objective slower then faster time
- Competitive rules - Choose if competitive rules are enabled
- (Default) Disabled - Competitive rules are disabled
- Enabled - Competitive rules are enabled
- Limit valid control points - Choose which map you capture the objective in
- (Default) All - All three maps are chosen and rotate depending on score to win
- First - Only the first map out of the three will be playable
- Second - Only the second map out of the three will be playable
- Third - Only the third map out of the three will be playable
- Score to win - Choose how many points need to be captured for there to be a victory
- (Default) 2 - Only 2 objectives need to be captured to win
- 1 - Only 1 objective needs to be captured to win
- 3 - only 3 objectives needs to be captured to win
- Scoring speed modifier - Choose how fast the scoring speed is
- (Default) 100% - Scoring speed is at standard time
- 0% - Scoring speed is slower then standard time
- 500% - Scoring speed is faster then standard time
Escort[ | ]
- Enabled - Choose whether you want escort enabled
- (Default) Off - Escort is disabled
- On - Escort is enabled
- Payload speed modifier - Choose how fast you push the payload
- (Default) 100% - The payload's speed is at standard time
- 500% - The payload's speed is faster then standard time
- 0% - The payload's speed is slower then standard time
- Competitive rules - Choose whether to play with or without competitive rules enabled
- (Default) Disabled - Competitive rules are not enabled
- Enabled - Competitive rules are enabled
Hybrid[ | ]
- Enabled - Choose whether you want hybrid enabled
- (Default) Off - Hybrid is disabled
- On - Hybrid is enabled
- Payload speed modifier - Choose how fast you push the payload
- (Default) 100% - The payload's speed is at standard time
- 500% - The payload's speed is faster then standard time
- 0% - The payload's speed is slower then standard time
- Competitive rules - Choose whether to play with or without competitive rules enabled
- (Default) Disabled - Competitive rules are not enabled
- Enabled - Competitive rules are enabled
- Capture Speed Modifier - Choose how fast you capture the objective
- (Default) 100% - Capture the objective at standard time
- 500% - Capture the objective faster then standard time
- 0% - Capture the objective slower then faster time
Push[ | ]
- Enabled - Choose if push is enabled
- (Default) Off - Push is disabled
- On - Push is enabled
- Competitive rules - Choose if competitive rules are enabled
- (Default) Off - Competitive rules are disabled
- On - Competitive rules are enabled
- TS-1 walk speed modifier - Choose how fast the TS-1 robot walks
- (Default) 100% - The TS-1 walks at standard walk speed
- 0% - The TS-1 walks slower then standard walk speed
- 500% - The TS-1 walks faster then standard walk speed
- TS-1 push speed modifier - Choose how fast the TS-1 pushes the barricade
- (Default) 100% - The TS-1 pushes at the standard push speed
- 0% - The TS-1 pushes slower then the standard walk speed
- 500% - The TS-1 pushes faster then the standard walk speed
Bounty hunter[ | ]
- Enabled - Choose whether bounty hunter is enabled
- (Default) Off - Bounty hunter is disabled
- On - Bounty hunter is enabled
- Base score for killing a bounty target - The score for killing the bounty target
- (Default) 300
- 0 - Minimum
- 1000 - Maximum
- Bounty increase per kill as bounty target - Choose how much your bounty gets increased per kill as target
- (Default) 0
- 1000 - Maximum
- Bounty Target Count - Choose how many bounty targets there are
- (Default) 1
- Score per kill - Choose how much points you get awarded per kill
- (Default) 100
- 0 - Minimum
- 1000 - Maximum
- Score per kill as bounty target - Choose how much points the bounty target gets awarded per kill
- (Default) 300
- 0 - Minimum
- 1000 - Maximum
Deathmatch (Bounty hunter)[ | ]
- Game length in minutes - Choose how long the game is
- (Default) 10
- 5 - Minimum
- 15 - Maximum
- Score to win - Choose how many points you need to get to win
- (Default) 20
- 1 - Minimum
- 5000 - Maximum
- Self initiated spawn - Choose whether players can respawn by their self or have to wait for the timer to end
- (Default) On - Players can respawn by their self
- Off - Players have to wait for the timer to end to respawn
Capture the Flag[ | ]
- Enabled - Choose if you want capture the flag enabled
- (Default) Off - Capture the Flag will not be enabled
- On - Capture the Flag will be enabled
- Blitz Flag Locations - Choose if you want blitz flag locations enabled
- (Default) No - Blitz flag locations will not be enabled
- Yes - Blitz flag locations will be enabled
- Damage interrupts flag interaction - Choose if players who take damage cannot interact with the flag
- (Default) Disabled - Damage will not interrupt players who interact with the flag
- Enabled - Damage will interrupt players who interact with the flag
- Flag carrier abilities - Choose if players with the flag can use an Ability
- (Default) Restricted - Players cannot use movement abilities while they have the flag
- None - No ability can be used while they have the flag
- All - All abilities can be used if they have the flag
- Flag dropped lock time - Choose how long the flag is locked for
- (Default) 5.00 - Standard flag lock time
- 0.00 - No flag lock time
- 10.00 - Maximum flag lock time
- Flag pick up time - Choose how long it takes to pick up the flag
- (Default) 0.00 - No time taken to pick up the flag
- 5.00 - Maximum time taken to pick up the flag
- Flag return time - Choose how long it takes to return the flag
- (Default) 4.00 - Standard flag return time
- 0.00 - No flag return time
- 5.00 - Maximum flag return time
- Flag score respawn time - Choose how long it takes for the flag to respawn
- (Default) 15.00 - Standard flag score respawn time
- 0.00 - No flag score respawn time
- 20.00 - Maximum flag score respawn time
- Game length (Minutes) - Choose how long the match takes
- (Default) 8
- 15 - Maximum
- 5 - Minimum
- Respawn speed buff duration - Choose how long players who respawn get a speed buff duration
- (Default) 0.00 - No speed buff duration
- 60.00 - Maximum speed buff duration
- Score to win - Choose how many flags need to be scored to win
- (Default) 3 - 3 flags need to be scored to win
- 1 - Only a single flag needs to be spawn to win
- 9 - Only 9 flags need to be scored to win
- Team needs flag at base to score - Choose if the opposing team needs to return their flag to their base to score
- (Default) No - The opposing team does not need to return their flag to their base to score
- Yes - The opposing team needs the flag at their base to score
Deathmatch[ | ]
- Enabled - Choose if you want deathmatch enabled
- (Default) Off- Deathmatch will not be enabled
- On - Deathmatch will be enabled
- Game length in minutes - Choose how long you want the match to be
- (Default) 10
- 5 - Minimum time allowed
- 15 - Maximum time allowed
- Score to win - Choose how many kills you need to win
- (Default) 20 - A player needs to reach 20 kills to win
- 1 - A player only needs a single kill to win
- 5000 - The maximum amount of kills needed to win
- Self initiated spawn - Choose whether players can respawn by them self
- (Default) On - Players can respawn within 3 seconds of dying
- Off - Players must wait until the timer has ended to respawn
Elimination[ | ]
- Enabled - Choose if elimination is enabled
- (Default) Off - Elimination is disabled
- On - Elimination is enabled
- Hero selection time - Choose how long players have to chose heroes
- (Default) 20 - 20 seconds allowed to chose heroes
- 60 - Maximum time allowed to chose heroes
- Score to win - Choose the score to win
- (Default) 3 - A team needs to win 3 times for victory
- 1 - A team needs to win 1 time for victory
- 9 - A team needs to win 9 times for victory
- Restrict previously used heroes - Choose if heroes played on the previous round are unavailable for the rest of the match
- (Default) Off - No heroes will get restricted
- After round won - Heroes only get restricted for the winning team
- After round played - Each team's heroes will be unavailable regardless of points/winning status
- Hero selection - Choose the hero selection for each match
- (Default) Any - All heroes will be available at the start of the round
- Limited - Only a small selection of heroes will be available
- Random - Players will be assigned a random hero
- Random (Mirrored) - Teams will be assigned a set of heroes which will be the same for both teams
- Limited choice pool - Choose how many limited heroes are available if selected limited from hero selection
- (Default) Team size +2 - The team size +2 heroes will be available to chose from
- Team size +3 - The team size +3 heroes will be available to chose from
- Team size - The amount of slots on your team will be the amount of heroes available on your team
- Team size +1 - The team size +1 hero will be available to chose from
- Capture objective tiebreaker - Choose if there will be a tiebreaker after a certain time is reached
- (Default) Enabled - Tiebreaker will be on
- Disabled - No tiebreaker will occur
- Tiebreaker after match time elasped - Choose how long it takes until a tiebreaker
- (Default) 105 - It takes 105 seconds for a tiebreaker to occur
- 30 - Minimum time it takes for a tiebreaker to occur
- 300 - Maximum time it takes for a tiebreaker to occur
- Time to capture - Choose how long it takes to capture the objective after tiebreaker
- (Default) 3 - Standard time to capture objective
- 1 - Minimum time to capture the objective
- 7 - Maximum time to capture the objective
- Draw after match time elapsed with no time breaker - Choose how long it takes for a draw to occur if tiebreaker is disabled
- (Default) 135 - It takes 135 seconds for a draw to occur
- 60 - Minimum time it takes for a draw to occur
- 300 - Maximum time it takes for a draw to occur
- Reveal heroes - Choose if you want heroes to be revealed after a certain amount of time
- (Default) Disabled - Heroes will never be revealed
- Enabled - Heroes will be revealed after a certain amount of time
- Reveal heroes after match time elasped - Choose how long it takes for heroes to be revealed if reveal heroes is enabled
- (Default) 75 - It takes 75 seconds for heroes to be revealed
- 180 - It takes 180 seconds for heroes to be revealed
- 0 - It takes 0 seconds for heroes to be revealed
Team deathmatch[ | ]
- Enabled - Choose if team deathmatch is enabled
- (Default) Off - Team deathmatch is disabled
- On - Team deathmatch is enabled
- Game length in minutes - Choose how long the game is
- (Default) 10 - The game is 10 minutes long
- 5 - The game is 5 minutes long
- 15 - The game is 15 minutes long
- Mercy resurrect counteracts kills - Choose whether Mercy's resurrect can remove one point from the opposing team
- (Default) On - Mercy will counteract kills with resurrection
- Off - Mercy will not counteract kills with resurrection
- Score to win - Choose how many kills a team needs to win
- (Default) 30 - A team needs 30 kills to win
- 1 - A team needs a single kill to win
- 200 - A team needs 200 kills to win
- Self initiated respawn - Choose if players can manually respawn
- (Default) On - Players can manually respawn
- Off - Players cannot manually respawn
- Imbalanced team score to win - Choose each teams win requirements
- (Default) Off - The score to win will be balanced
- On - The score to win will be imbalanced
- Team 1 score to win - Choose how much team 1 needs to score to win
- (Default) 30 - Team 1 needs 30 kills to win
- 1 - Team 1 needs a single kill to win
- 200 - Team 1 needs a single kill to win
- Team 2 score to win - Choose how much team 2 needs to score to win
- (Default) 30 - Team 2 needs 30 kills to win
- 1 - Team 2 needs a single kill to win
- 200 - Team 2 needs a single kill to win
Practice Range[ | ]
- Enabled - Choose if you want Practice Range enabled
- (Default) Off - The practice range is not enabled
- On - The practice range is enabled
- Spawn training bots - Choose if training bots spawn
- (Default) Enabled - Training bots will spawn
- Disabled - Training bots will not spawn
- Training bot respawn time scalar - Choose how long it takes for a training bot to spawn
- (Default) 100% - Training bots spawn at a regular rate
- 10% - Training bots spawn nearly instantly after death
- 500% - Training bots spawn at a slower rate
- Training partner - Choose whether the training partner spawns
- (Default) Enabled - The training partner spawns in
- Disabled - The training partner does not spawn in and the console does not work
Skirmish[ | ]
- Enabled - Choose if skirmish is enabled
- (Default) Off - Skirmish will not be enabled
- On - Skirmish will be enabled
- Limit valid control points - Choose how many control points are accessible
- (Default) All - All control points will be open
- First - Only the first control point will be open
- Second - Only the second control point will be open
- Third - Only the third control point will be open
Maps[ | ]
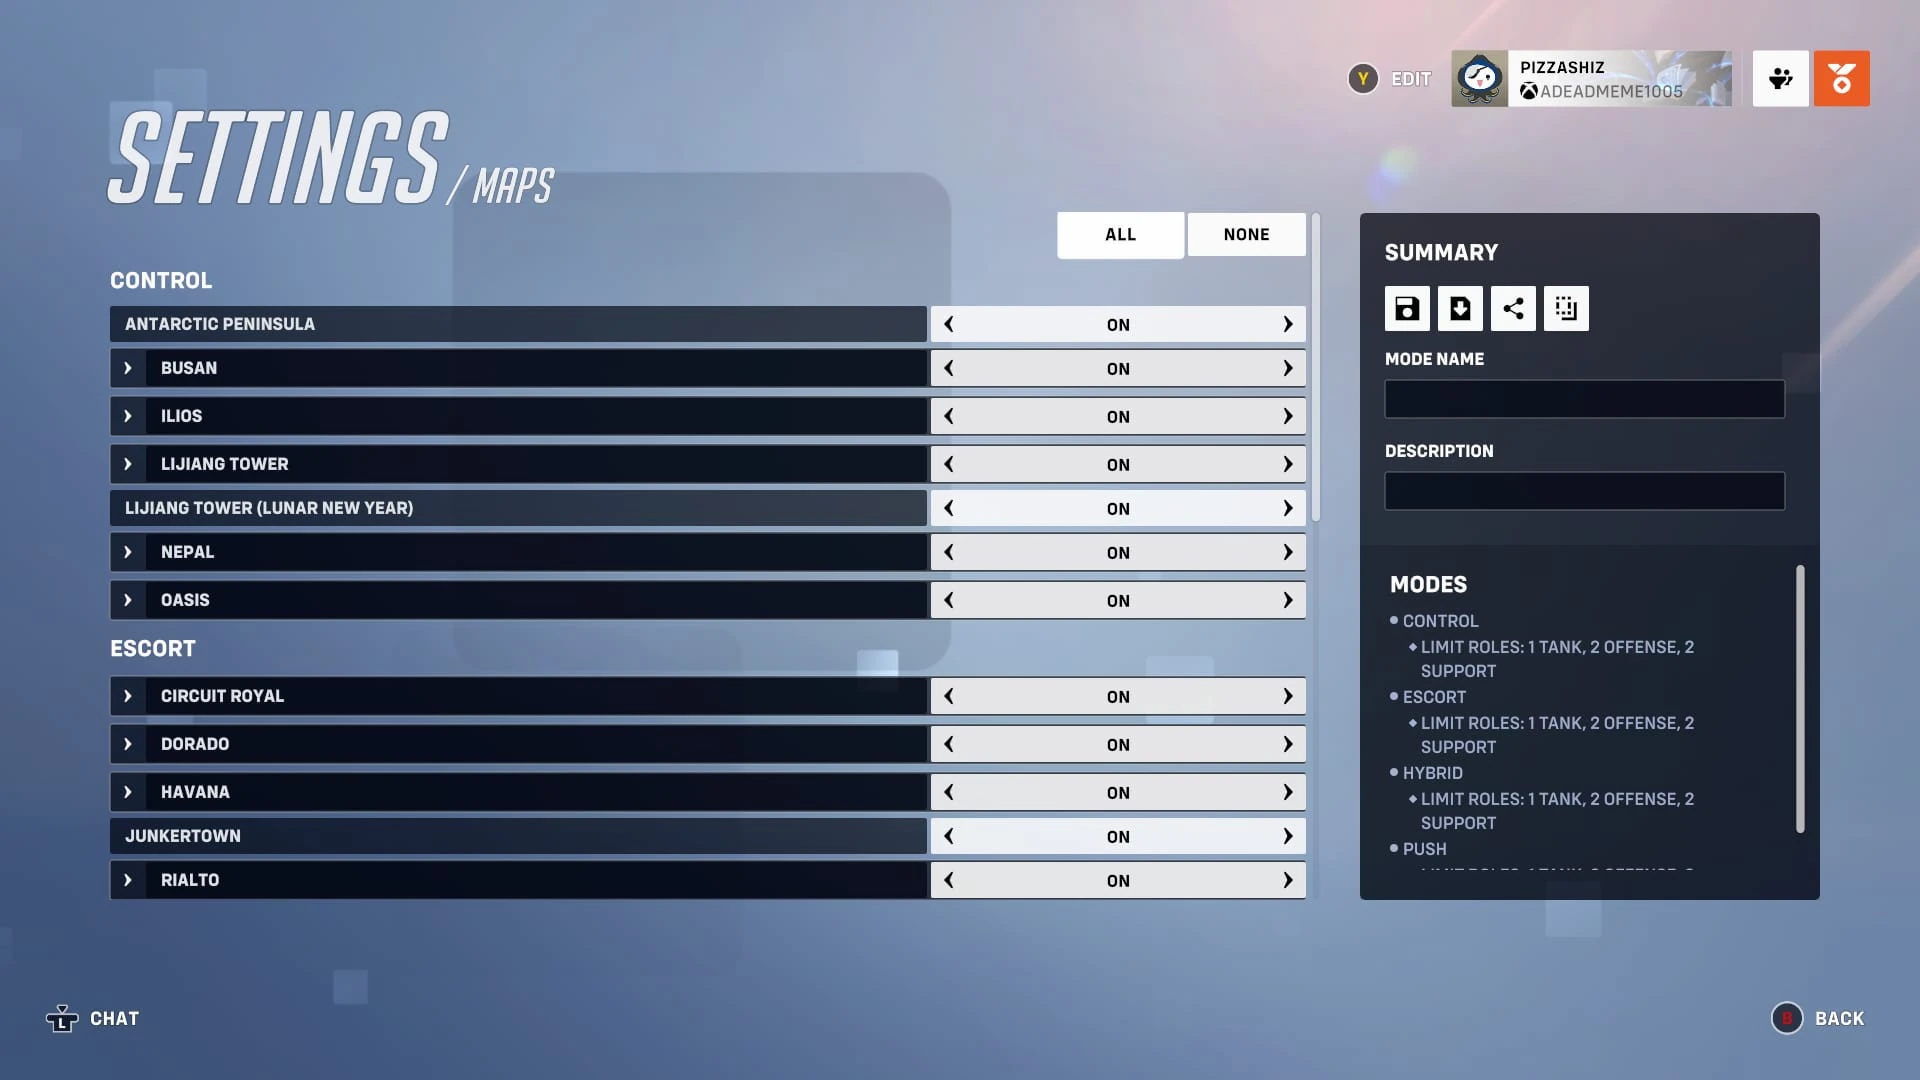
Maps section of settings.
In this section we will go over each game mode and the maps that you can chose. In the game, you can chose whether or not you wish to have maps on or off.
Assault[ | ]
Standard[ | ]
Seasonal[ | ]
- Hanamura (Winter)
Bounty hunter[ | ]
Standard[ | ]
- Black Forest
- Castillo
- Château Guillard
- Dorado
- Ecopoint: Antarctica
- Eichenwalde
- Hanamura
- Havana
- Hollywood
- Horizon Lunar Colony
- Ilios Lighthouse
- Ilios Ruins
- Ilios Well
- Kanezaka
- King's Row
- Lijiang Control Center
- Lijiang Garden
- Lijiang Night Market
- Malevento
- Necropolis
- Nepal Sanctum
- Nepal Shrine
- Nepal Village
- Oasis City Center
- Oasis Gardens
- Oasis University
- Paris
- Petra
- Temple Of Anubis
- Volskaya Industries
- Workshop Chamber
- Workshop Expanse
- Workshop Green Screen
- Workshop Island
Time of day[ | ]
- Dorado (Night)
- Dorado (Evening)
- Eichenwalde (Morning)
- Eichenwalde (Evening)
- Havana (Morning)
- Havana (Night)
- Hollywood (Morning)
- Hollywood (Night)
- King's Row (Night)
- King's Row (Evening)
- Workshop Expanse (Night)
- Workshop island (Night)
Seasonal[ | ]
- Black Forest (Winter)
- Blizzard World (Winter
- Château Guillard (Halloween)
- Ecopoint: Antarctica (Winter)
- Eichenwalde (Halloween)
- Hanamura (Winter)
- King's Row (Winter)
- Lijiang Control Center (Lunar New Year)
- Lijiang Garden (Lunar New Year)
- Lijiang Night Market (Lunar New Year)
Capture the flag[ | ]
Standard[ | ]
- Ayutthaya
- Busan Downtown
- Busan Sanctuary
- Ilios Lighthouse
- Ilios Ruins
- Ilios Well
- Lijiang Control Center
- Lijiang Garden
- Lijiang Night Market
- Nepal Sanctum
- Nepal Shrine
- Nepal Village
- Oasis City Center
- Oasis Gardens
- Oasis University
Seasonal[ | ]
- Busan Downtown (Lunar New Year)
- Busan Sanctuary (Lunar New Year)
- Lijiang Control Center (Lunar New Year)
- Lijiang Garden (Lunar New Year)
- Lijiang Night Market (Lunar New Year)
Control[ | ]
Standard[ | ]
- Antarctic Peninsula
- Busan
- Ilios
- Lijiang Tower
- Nepal
- Oasis
- Samoa
Time of day[ | ]
- Antarctic Peninsula (Night)
- Antarctic Peninsula (Morning)
- Busan (Overcast)
- Busan (Night)
- Busan (Morning)
- Ilios (Evening)
- Ilios (Morning)
- Lijiang Tower (Dawn)
- Lijiang Tower (Night)
- Nepal (Evening)
- Nepal (Morning)
- Oasis (Evening)
- Oasis (Night)
- Oasis (Morning)
Seasonal[ | ]
- Lijiang Tower (Lunar New Year)
Deathmatch[ | ]
Standard[ | ]
- Black Forest
- Castillo
- Château Guillard
- Dorado
- Ecopoint: Antartica
- Eichenwalde
- Hanamura
- Havana
- Hollywood
- Horizon Lunar Colony
- Ilios Lighthouse
- Ilios Riuns
- Ilios Well
- Kanezaka
- King's Row
- Lijiang Control Center
- Lijiang Garden
- Lijiang Night Market
- Malevento
- Necropolis
- Nepal Sanctum
- Nepal Shrine
- Nepal Village
- Oasis City Center
- Oasis Gardens
- Oasis University
- Paris
- Petra
- Route 66
- Temple Of Anubis
- Volskaya Industries
- Workshop Chamber
- Workshop Expanse
- Workshop Green Screen
- Workshop Island
Time of day[ | ]
- Dorado (Night)
- Dorado (Evening)
- Eichenwalde (Evening)
- Eichenwalde (Morning)
- Havana (Night)
- Havana (Morning)
- Hollywood (Night)
- Hollywood (Morning)
- King's Row (Night)
- King's Row (Evening)
- Route 66 (Night)
- Route 66 (Overcast)
- Route 66 (Morning)
- Workshop Expanse (Night)
- Workshop Island (Night)
Seasonal[ | ]
- Black Forest (Winter)
- Blizzard World (Winter
- Château Guillard (Halloween)
- Ecopoint: Antarctica (Winter)
- Eichenwalde (Halloween)
- Hanamura (Winter)
- Hollywood (Halloween)
- King's Row (Winter)
- Lijiang Control Center (Lunar New Year)
- Lijiang Garden (Lunar New Year)
- Lijiang Night Market (Lunar New Year)
Elimination[ | ]
Standard[ | ]
- Ayutthaya
- Black Forest
- Castillo
- Ecopint: Antarctica
- Ilios Lighthouse
- Ilios Ruins
- Ilios Well
- Lijiang Control Center
- Lijiang Garden
- Lijiang Night Market
- Necropolis
- Nepal Sanctum
- Nepal Shrine
- Nepal Village
- Oasis City Center
- Oasis Gardens
- Oasis University
- Workshop Chamber
- Workshop Expanse
- Workshop Green Screen
- Workshop Island
Time of day[ | ]
- Workshop Expanse (Night)
- Workshop Island (Night)
Seasonal[ | ]
- Black Forest (Winter)
- Ecopoint: Antarctica (Winter)
- Lijiang Control Center (Lunar New Year)
- Lijiang Garden (Lunar New Year)
- Lijiang Night Market (Lunar New Year)
Escort[ | ]
Standard[ | ]
- Circuit Royal
- Dorado
- Havana
- Junkertown
- Rialto
- Route 66
- Shambali Monastery
- Watchpoint: Gibraltar
Time of day[ | ]
- Circuit Royal (Morning)
- Circuit Royal (Night)
- Dorado (Evening)
- Dorado (Night)
- Havana (Morning)
- Havana (Night)
- Rialto (Evening)
- Rialto (Morning)
- Route 66 (Morning)
- Route 66 (Overcast)
- Route 66 (Night)
- Watchpoint: Gibraltar (Evening)
- Watchpoint: Gibraltar (Morning)
Flashpoint[ | ]
Standard[ | ]
Hybrid[ | ]
Standard[ | ]
Time of day[ | ]
- Blizzard World (Overcast)
- Blizzard World (Morning)
- Blizzard World (Night)
- Eichenwalde (Evening)
- Eichenwalde (Morning)
- Hollywood (Night)
- Hollywood (Morning)
- King's Row (Night)
- King's Row (Evening)
- Paraíso (Evening)
Seasonal[ | ]
- Blizzard World (Winter)
- Eichenwalde
- Hollywood (Halloween)
- King's Row (Winter)
Practice Range[ | ]
Standard[ | ]
- Practice Range
Push[ | ]
Standard[ | ]
Time of day[ | ]
- Colosseo (Evening)
- Colosseo (Mroning)
- New Queen Street (Dawn)
- New Queen Street (Morning)
Skirmish[ | ]
Standard[ | ]
- Antarctic Peninsula
- Blizzard World
- Busan
- Circuit Royal
- Colosseo
- Dorado
- Eichenwalde
- Esperança
- Hanamura
- Havana
- Hollywood
- Horizon Lunar Colony
- Ilios
- Junkertown
- King's Row
- Lijiang Tower
- Nepal
- New Queen Street
- Numbani
- Oasis
- Paraíso
- Paris
- Rialto
- Route 66
- Samoa
- Shambali Monastery
- Temple of Anubis
- Volskaya Industries
- Watchpoint: Gibraltar
- Workshop Chamber
- Workshop Expanse
- Workshop Green Screen
- Workshop Island
Time Of Day[ | ]
- Blizzard World (Morning)
- Blizzard World (Overcast)
- Blizzard World (Night)
- Busan (Night)
- Busan (Morning)
- Busan (Overcast)
- Circuit Royal (Night)
- Circuit Royal (Morning)
- Colosseo (Evening)
- Colosseo (Morning)
- Dorado (Night)
- Dorado (Evening)
- Eichenwalde (Evening)
- Eichenwalde (Morning)
- Havana (Night)
- Havana (Morning)
- Hollywood (Night)
- Hollywood (Morning)
- Ilios (Evening)
- Ilios (Morning)
- King's Row (Night)
- King's Row (Evening)
- Lijiang Tower (Night)
- Lijiang Tower (Dawn)
- Nepal (Dawn)
- Nepal (Morning)
- New Queen Street (Dawn)
- New Queen Street (Morning)
- Oasis (Night)
- Oasis (Evening)
- Oasis (Morning)
- Rialto (Evening)
- Rialto (Morning)
- Route 66 (Night)
- Route 66 (Morning)
- Route 66 (Overcast)
- Watchpoint: Gibraltar (Evening)
- Watchpoint: Gibraltar (Morning)
- Workshop Expanse (Night)
- Workshop Island (Night)
Seasonal[ | ]
- Blizzard World (Winter)
- Eichenwalde (Halloween)
- Hanamura (Winter)
- Hollywood (Halloween)
- King's Row (Winter)
- Lijiang Tower (Lunar New Year)
Team deathmatch[ | ]
Standard[ | ]
- Black Forest
- Blizzard World
- Castillo
- Château Guillard
- Dorado
- Ecopoint: Antartica
- Eichenwalde
- Hanamura
- Havana
- Hollywood
- Horizon Lunar Colony
- Ilios Lighthouse
- Ilios Riuns
- Ilios Well
- Kanezaka
- King's Row
- Lijiang Control Center
- Lijiang Garden
- Lijiang Night Market
- Malevento
- Necropolis
- Nepal Sanctum
- Nepal Shrine
- Nepal Village
- Oasis City Center
- Oasis Gardens
- Oasis University
- Paris
- Petra
- Route 66
- Temple Of Anubis
- Volskaya Industries
- Workshop Chamber
- Workshop Expanse
- Workshop Green Screen
- Workshop Island
Time of day[ | ]
- Blizzard World (Morning)
- Blizzard World (Overcast)
- Blizzard World (Night)
- Dorado (Night)
- Dorado (Evening)
- Eichenwalde (Evening)
- Eichenwalde (Morning)
- Havana (Night)
- Havana (Morning)
- Hollywood (Night)
- Hollywood (Morning)
- King's Row (Night)
- King's Row (Evening)
- Route 66 (Night)
- Route 66 (Morning)
- Route 66 (Overcast)
- Workshop Expanse (Night)
- Workshop Island (Night)
Seasonal[ | ]
- Black Forest (Winter)
- Blizzard World (Winter
- Château Guillard (Halloween)
- Ecopoint: Antarctica (Winter)
- Eichenwalde (Halloween)
- Hanamura (Winter)
- Hollywood (Halloween)
- King's Row (Winter)
- Lijiang Control Center (Lunar New Year)
- Lijiang Garden (Lunar New Year)
- Lijiang Night Market (Lunar New Year)
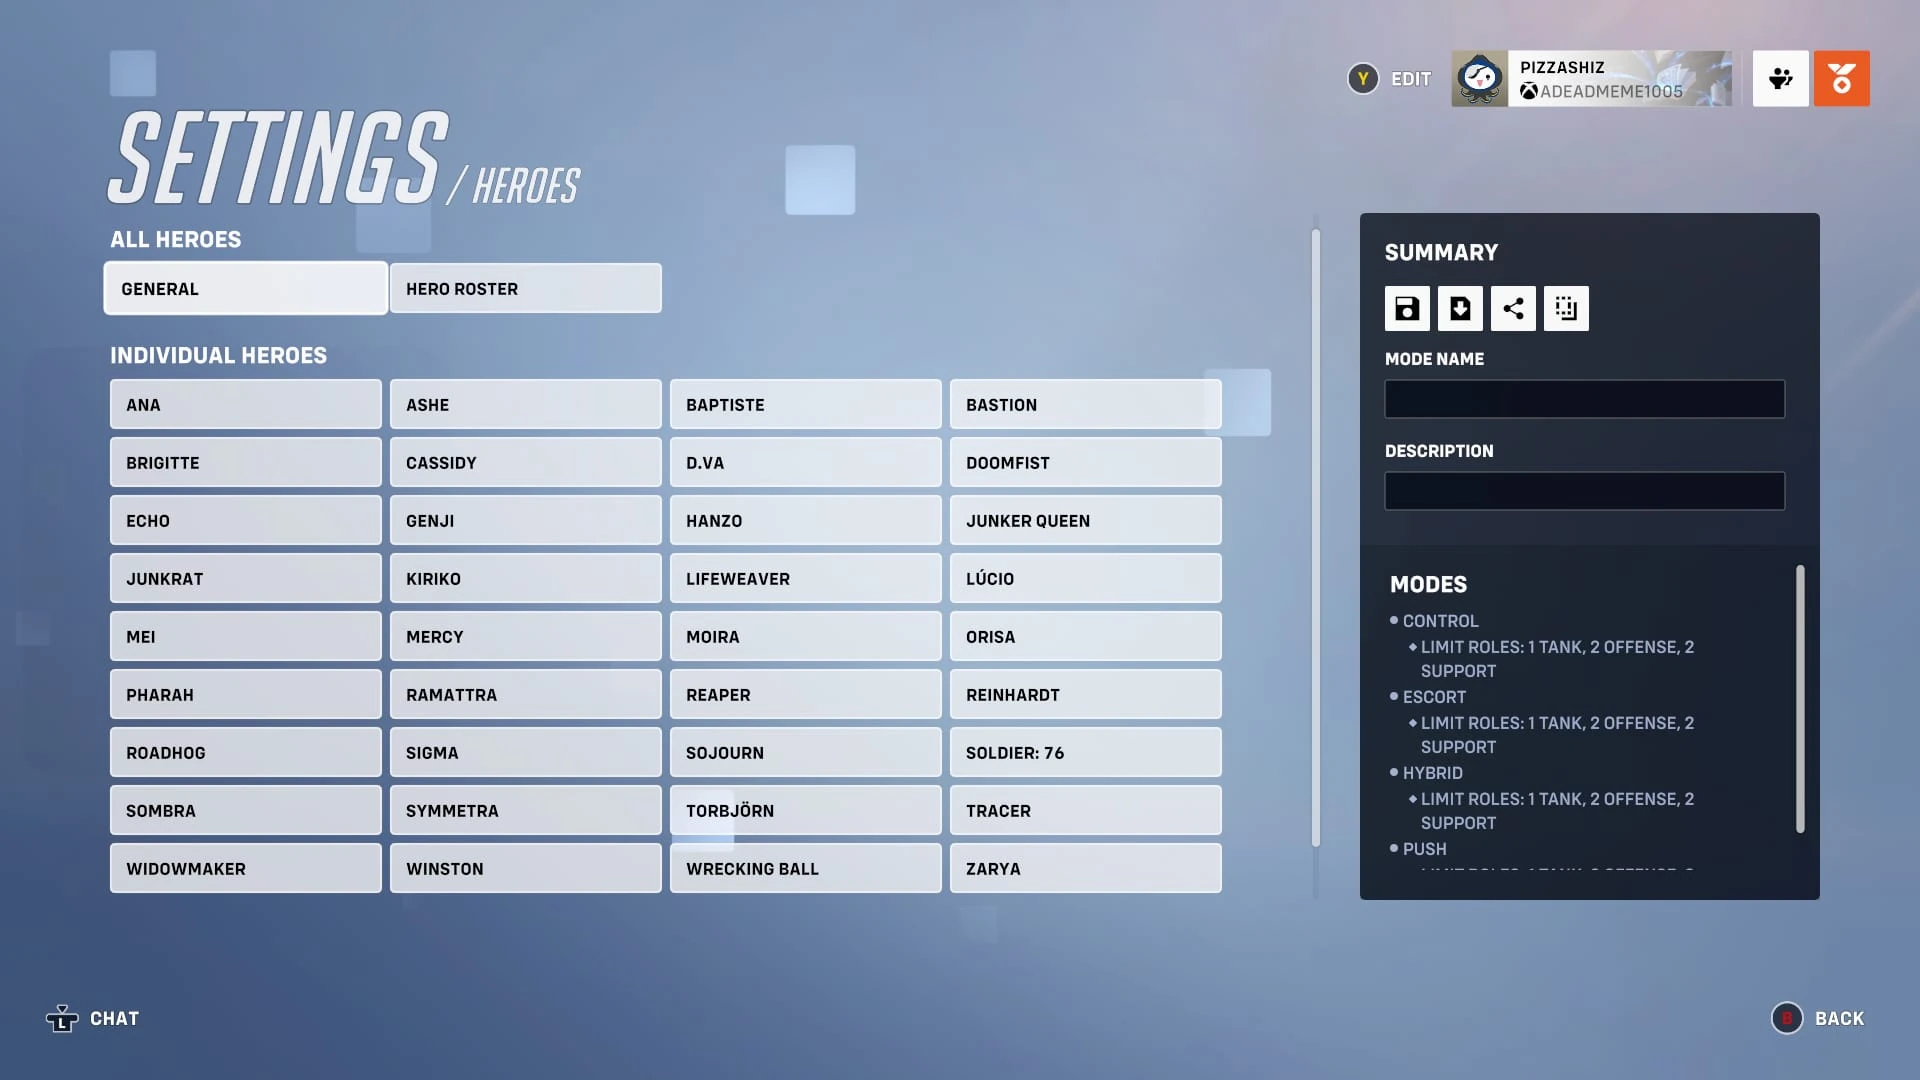

Heroes settings menu.
Heroes[ | ]
General[ | ]
- Teams - Choose what teams the settings apply to
- (Default) All teams - All teams will receive all applied settings
- Team 1 - Team 1 will receive all applied settings
- Team 2 - Team 2 will receive all applied settings
Abilities[ | ]
- Ability Cooldown Time - Choose how fast the cooldowns for abilities are
- (Default) 100% - Standard cooldowns
- 0% - Faster cooldowns
- 500% - Slower cooldowns
- Quick Melee - Choose whether Quick melee is enabled
- (Default) Enabled - Quick melee is enabled
- Disabled - Quick melee is disabled
- Ultimate ability - Choose whether players can use the ultimate ability
- (Default) Enabled - Players can use the ultimate ability
- Disabled - Players cannot use the ultimate ability
- Ultimate generation - Choose how fast players can generate their ultimate ability
- (Default) 100% - Standard ultimate generation
- 0% - Players will not generate their ultimate
- 500% - Players will generate their ultimate at a faster rate
- Ultimate generation - Combat - Choose how fast players get their ultimate when they deal damage
- (Default) 100% - Standard ultimate generation via combat
- 0% - Players will not generate their ultimate via combat
- 500% - Players will generate their ultimate at a faster rate via combat
- Ultimate generation - Passive - Choose how fast players get their ultimate passively
- (Default) 100% - Standard ultimate generation via passive generation
- 0% - Players will not generate their ultimate via passive generation
- 500% - Players will generate their ultimate at a faster rate via passive generation
- Ultimate generation - Passive - Choose how fast players get their ultimate passively
- Ultimate generation - Combat - Choose how fast players get their ultimate when they deal damage
- Spawn with ultimate ready - Choose if players start with their ultimate ability
- (Default) Disabled - Players will not start with their ultimate ability
- Enabled - Players will spawn with their ultimate ability
- Ultimate duration - Choose how long ultimates will last
- (Default) 100% - Standard ultimate duration
- 25% - Ultimates last for a shorter amount of time
- 500% - Ultimates will last longer
- Infinite ultimate duration - Choose if ultimate abilities will forever
- (Default) Disabled - Player's ultimates will not last forever
- Enabled - Player's ultimates will last forever
Combat Modifiers[ | ]
- Damage dealt - Choose how much damage players can deal
- (Default) 100% - Standard damage dealt
- 10% - Less then standard damage dealt
- 500% - More then standard damage dealt
- Damage received - Choose how much damage can be received
- (Default) 100% - Standard damage received
- 10% - Less then standard damage received
- 500% - More then standard damage received
- Healing dealt - Choose how much healing can be dealt
- (Default) 100% - Standard healing dealt
- 10% - Less then standard healing dealt
- 500% - More then standard healing dealt
- Healing received - Choose how much healing players can received
- (Default) 100% - Standard healing received
- 10% - Less then standard healing received
- 500% - More then standard heling received
- Health - Choose how much Hit points players can have
- (Default) 100% - Standard health for each hero
- 10% - Less then standard health for each hero
- 500% - More then standard health for each hero
- Jump vertical speed - Choose how high players can jump
- (Default) 100% - Standard vertical gravity
- 25% - Less then standard vertical gravity
- 800% - More then standard vertical gravity
- Movement gravity - Choose how gravity affects movement
- (Default) 100% - Standard movement gravity
- 25% - Less then standard movement gravity
- 400% - More then standard movement gravity
- Movement speed - Choose how fast players move
- (Default) 100% - Players move at normal speeds
- 50% - Players move less then normal speeds
- 300% - Players move more then normal speeds
- Projectile gravity - Choose the gravity of projectiles
- (Default) 100% - Standard projectile gravity
- 0% - Less then standard projectile gravity
- 500% - More then standard projectile gravity
- Projectile speed - Choose the speed of projectiles
- (Default) 100% - Standard projectile speed
- 0% - Less then standard projectile speed
- 500% - More then standard projectile speed
- Receive headshots only - Choose if you can only take damage from headshots
- (Default) Disabled - You can receive any kind of damage
- Enabled - You can only receive damage from headshots
Weapons[ | ]
- Primary fire - Choose if players can use their primary fire
- (Default) Enabled - Players can use their primary fire
- Disabled - Players cannot use their primary fire
- Ammunition clip size scalar - Choose the size of the ammunition clip
- (Default) 100% - Standard clip size
- 25% - Less then standard clip size
- 500% - More then standard clip size
- No ammunition required - Choose whether players have infinite ammunition
- (Default) Off - Players will not have infinite ammunition
- On - Players will have infinite ammunition
Hero roster[ | ]
You can chose whether the following heroes are on or off.
- Ana
- Ashe
- Baptiste
- Bastion
- Brigette
- Cassidy
- D.va
- Doomfist
- Echo
- Genji
- Hanzo
- Illari
- Junker Queen
- Junkrat
- Kiriko
- Lifeweaver
- Lúcio
- Mauga
- Mei
- Mercy
- Moira
- Orisa
- Pharah
- Ramattra
- Reaper
- Reinhardt
- Roadhog
- Sigma
- Sojourn
- Soldier: 76
- Sombra
- Symmetra
- Torbjörn
- Tracer
- Widowmaker
- Winston
- Wrecking Ball
- Zarya
- Zenyatta
Trivia[ | ]
- If you select an empty slot in the lobby, you can invite a player instead of using the invite button.
- Assault used to be a primary game mode in overwatch 1 but got removed from game mode rotation due to popular demand.
- 8 player FFA, Mystery Heroes and quick play classic can only be found in unranked yet appear in the arcade preset section instead of the standard section.
- Although being a workshop mode mirrored deathmatch and hero gauntlet have a chance to also be in the arcade rotation.
- Capture the Flag is the only original seasonal game mode to make an all year appearance in the arcade preset section.
- Although being in the arcade preset section, Capture the Flag - 2017 does not appear in the arcade rotation anymore.
- Skirmish is exclusive to the While you wait option yet it appears in the arcade preset section.
- Low Gravity is the only arcade mode that does not appear in the arcade section of the presets menu.
- The server load workshop example is the only example that does not have a number.
- Although not being used since the release of overwatch 2, use experimental update if available is an option in the custom game's settings.
- The kill cam and kill feed settings get overridden by player settings.
- The two of each role setting can be a reference to overwatch 1 where it was 2,2,2 instead of 1,2,2.
- The respawn as random hero setting is the game rules for mystery heroes.
- Although Assault is not in competitive rotation, it still has competitive rules.
- The TS-1 Robot has separate walk speeds during his push and his walk states.
- You can change how much time you can have per match using the workshop editor.
- Although you cannot move the bounty target count scalar bar, it is still a setting.
- Although being a frequent game mode, CTF: Blitz is not in the modes settings. However, you can adapt Capture the Flag to match these settings.
- Although being a setting, the training bot respawn time scalar option does not affect the bots in the practice range.
- Assault is the only game mode where there are no time of day maps.
- There are no seasonal escort maps.
- Hollywood (Halloween) is not available for deathmatch, unlike Hollywood.
- The workshop programme is the only settings menu to not show the summary whilst editing.
- As of season 6, the custom games logo has been shortened to just Sombra's hack ability.
| ||||||||||||||||||||